home

 One of the things I like most is receiving email from around the
world and answering bicycle questions. I’ve replied to thousands while
I’ve had this site and since I became a cycling technical writer in 1983. If you have a question, email
me and I’ll reply as soon as possible.
One of the things I like most is receiving email from around the
world and answering bicycle questions. I’ve replied to thousands while
I’ve had this site and since I became a cycling technical writer in 1983. If you have a question, email
me and I’ll reply as soon as possible.
Or, if you prefer, browse my bicycle FAQ here, where there’s a good
chance you’ll find an answer. This page is divided
into sections shown below and each section includes an index of included
questions to make jumping to topics easy. You may also
search this document for any word using your browser’s Find function
(click Edit and select Find).
For more of my bicycle technical questions and answers, news and fun bike
stuff, be sure to follow my Bicycle
Beat blog, and my Tech
Talk column on RoadBikeRider.com too.
Good reading!
Jim Langley
 (back
to top)
(back
to top)
Road
cycling shoes
Chain
holder
Rollers
or trainer
Kid trailers
Keeping your feet warm
Road cycling
shoes
 What do I need to know to get a good pair of road cycling
shoes?
What do I need to know to get a good pair of road cycling
shoes?
 The most important thing is to get shoes
that fit right and are comfortable, and the best way to figure this out
is to try on lots of different shoes and compare how they feel. How a
road shoe should fit depends a lot on how you use it.
The most important thing is to get shoes
that fit right and are comfortable, and the best way to figure this out
is to try on lots of different shoes and compare how they feel. How a
road shoe should fit depends a lot on how you use it.
If you’re
a serious road cyclist who spends most of your biking time, biking (versus
walking a fair amount here and there), youll want rigid-soled road shoes
that fit glove-like on your feet allowing just enough room for toe wiggling.
The shoes should be about ½ size snugger than a running shoe. The reason
is, your feet do not move in a cycling shoe when youre pedaling and you
dont want them to because it would be inefficient and could lead to chafing
and blisters and pain.
If, on the other hand (or should I say foot?), youre going to be touring
or riding centuries and you plan to walk a good bit on your rides at food
stops or for sight seeing, you should get walkable shoes that take a recessed
cleat (the cleat is the part that joins the shoes to the pedals). These
shoes have a more flexible and sticky sole thats much better for walking.
And you should get these shoes slightly larger than the serious road shoes
because youll need some toe room for comfort when walking.
The best place to learn about shoes and find out what works for you and
your feet is at a bike shop. I suggest trying on inexpensive shoes and
more pricey models to see if you can feel a difference. Be sure to ask
the salesperson to check the fit and talk to them about which shoes are
best for your intended use. Dont be afraid to spend some money if you
really like the fit and feel of a shoe.
Remember that a good cycling shoe will last a long, long time. I ride
literally every day and I can easily get 5 years or more of use out of
a good cycling shoe (I do take care of them by walking in them carefully
and drying them carefully after riding in the rain by stuffing them with
newspaper).
So, though the initial price may seem high for a top-notch shoe like a
Sidi or Carnac, if you average out the cost over a number of years, the
shoes are actually more affordable than your average pair of cross trainers
(which last a year at the most). There are definitely a lot of choices and it can
seem bewildering but there are significant differences in how the shoes
fit and feel and that’s the easiest way to narrow down your choices.
If it helps, Ive been cycling for a long time, and my experience has
been that Italian shoes are the best. Theyre also among the most costly
($100 to $300). (But remember what I said about how long they last.)
(Back
to Accessories index)
Chain holder
There was an accessory that when one removed their rear
wheel, you could take this device and mount it into the rear dropout.
This would enable your chain to freewheel without the rear cluster. Then
one could clean the chain with one of those chain-cleaner tools. This
device was made of aluminum with a plastic knob that turned to secure
this tool in the dropout. Pedro’s makes one that self-destructs
after two cleanings because it is made of cheap plastic. Can you offer
any suggestions on other tools or ways to do this?
I have one of these tools in my toolbox,
but mine’s plastic, too. It’s not cheap plastic, though. I’ve
had it for a long time and it’s held up fine. To try to find one,
I looked in Quality Bicycle Products, the Third Hand, Park Bicycle Tools
and searched online and couldn’t turn one up, which is disappointing
to say the least.
So, since I can’t tell you where to buy one, I’m going to
suggest that in the grand tradition of bicyclists everywhere, you make
your own! In fact, with just a little expense, you ought to be able to
make one that’ll last a lifetime.
All you need is a bent rear wheel that a bike shop has discarded or that
you find at a flea market or that you take off an abandoned bike. Ideally
the wheel will have a quick-release hub. If you can find a wheel like
this, you can remove the freewheel/cassette, then cut the spokes out and
remove the rim and spokes. This will leave you with just the rear hub.
Reinstall the freewheel/cassette and quick release skewer and you have
a handy chain holder for cleaning the chain. It’ll be bigger than
the plastic ones, but it should work better because it won’t ever
loosen while you work and it might even help clean the chain with the
teeth on the cassette poking through the links on each revolution.
By the way, I have heard from some Pedro’s
Chain Keeper (click on Bike Care Kits) users who say the tool works
great so I think it’s possible that you got a defective one. You
might consider giving it a second try.
(Back
to Accessories index)
Rollers or trainer
I want to ride this winter but I’m not sure what type
of indoor trainer to buy. Can you give me the pros and cons of rollers
and trainers?
Sure:
Rollers are comprised of a frame that rests on the floor
and holds 3 (usually) cylinders (also called rollers or drums) that spin.
You place your bike on top of the rollers and start pedaling and you can
ride, the same way you ride outdoors. You must keep pedaling and steer
to remain balanced and stay on top of the rollers. If you steer too far
to the right or left, you’ll ride off the front roller and fall over.
Often, there is a resistance device built into the roller to provide different
workout levels.
Pros of rollers
1) They teach excellent balance because you have to steer
to stay on.
2) They take skill to ride so time passes more quickly.
3) They’re fun to ride.
4) You’ll dazzle non-biker friends who think it’s some
kind of magic trick when you ride in place.
Cons of rollers
1) You have to steer so it’s hard to focus on TV or videos.
2) You don’t get comfortable on them right away so it
takes a bit of practice before you can work out hard, sprinting and climbing
out of the saddle; some people never get good enough to do it.
Other Trainers
The alternative to rollers are indoor trainers (often called Wind Trainers).
These are comprised of triangular folding steel frames that support the
rear wheel of the bike. Usually, there is a resistance device incorporated
into the trainer and that’s where the designation, wind, mag (for magnetic)
or fluid comes in.
Pros of trainers
1) Easy to use: just install your bike (a 2-minute job)
and ride; no practice needed.
2) No bike control required so you may fully concentrate
on TV or whatever.
3) You can sprint or climb standing right away.
4) Almost no risk of falling over.
5) They fold up and can be stored and taken along easily.
Cons of trainers
None
About Wind, Magnetic and Fluid
Basically, all are designations for the ways that the resistance device
creates the drag on the rear wheel to make you work hard. The first type
to come along was wind, which was a fan that caught air to create drag.
Then came magnetic, which used magnets to cause the drag. And the latest
is fluid, which traps the fan in a liquid bath to create the drag. All
three work but fluid is quietest (most expensive) though mags are close
(a little less expensive than fluid). Wind is the noisiest but usually
the cheapest. All designs work, so I’d recommend trying the one you’re
thinking of getting before buying to see how easy it is to mount your
bike and to discover how smoothly and quietly it operates.
(Back
to Accessories index)
Kid trailers
I’m thinking of getting a trailer to bring my young
kids along on rides. Any advice on what I should look for?
Child trailers make a lot of sense because
they allow towing two kids (even kids too young to ride in baby seats)
in a fairly well-protected rolling environment. You can put books, toys,
food, a radio, etc. in with your kids to keep them comfortable and happy.
Most trailers provide shelter from wind, rain, sun and the cold; and some
level of shock absorption against rough roads .
Trailers are stable and not prone to tipping. They also carry cargo so
you can combine rides with grabbing some groceries. And they’re
pretty easy to pull with the exception of climbing steep hills and fighting
strong headwinds. You can still ride, but you’ll want low gears
and should probably choose routes that minimize these difficulties.
You can find trailers or information about trailers in any good bike shop.
The company that has a long-standing reputation in trailers is Burley.
But, you’ll find shops offering trailers by other makers as well.
When shopping, try the trailer out to see how easy it is to attach and
detach from the bicycle you’ll use it with. Ideally, it’ll
be a 2-minute task. Otherwise, you may be less inclined to use the trailer.
Nice features to look for include manageable total weight so you’re
not pulling too hefty a load; and quick and easy folding or collapsing,
which makes it much easier to fit the trailer in a car should you want
to take it on vacation or simply drive to a nice place to bike with your
family.
When using a trailer, pick paths and roads that are compatible with your
wide load. If you choose busy bike paths frequented by inline skaters,
joggers and dog walkers, ride very carefully because the extra width of
the trailer can surprise other path users who are not always paying attention.
Usually, you get used to the width of the trailer quickly and don’t
have problems running into things. But, it’s definitely important
to always keep in mind that the trailer is back there and that snagging
things with the trailer (such as parking meters) could lead to injury
to you and the kids.
One of best things about these trailers is excellent resale value because
the demand is so high for used child trailers. When your kids are grown
and you no longer need the trailer, just run an ad in the classifieds
and the trailer will sell before you know it for at least half what you
paid for it.
(Back
to Accessories index)
Keeping your feet
warm
My feet freeze when it’s less than 40 degrees out.
What do you recommend??
I like booties that you wear over your
cycling shoes. The ones that have worked best for me are made of neoprene,
the same stuff wetsuits are made of. A lot depends on your feet and how
good your circulation is. But these work for me around here in northern
California. Of course it doesn’t get much below 35 degrees here
in the winter but sometimes we get ice on the roads and I usually average
around 17mph on rides, which makes it colder with wind chill.
These booties work for me in those conditions. Some people recommend putting
plastic bags inside your shoes (over your socks) to keep the wind out
too. You’ll have to try this yourself to see if it makes you too
hot or works.
Some riders, who apparently have good circulation in their feet, just
cut up a large pair of wool socks and pull them over their shoes as booties.
So that’s another way to go or something you can try if you don’t
want to buy booties right away. By the way, what I’ve found with
booties is that they definitely keep your feet warmer longer. But, if
you stay out long enough (several hours) your feet will end up getting
cold eventually anyway.
Another trick is to use your mountain-biking shoes for road riding. These
usually fit more loosely than the road shoes allowing a thicker sock (wool
socks insulate great, wick moisture and provide warmth when dry and
wet). Plus, off-road shoes are made of thicker material for more insulation.
Finally, don’t tie or strap your shoes too tightly when it’s
cold because that will cut off the circulation to your feet letting them
freeze more quickly.
(Back
to Accessories index)
 (back
to top)
(back
to top)
Selling used bicycles
LandRider
(aka the Autobike)
Finding a highwheel bike
Selling used bicycles
My
parents have a couple of old bikes they no longer use. How would you recommend
selling them?
It’s
pretty easy to sell used bicycles. Just place an ad in the local newspaper
and you’ll probably find a buyer. Or, you could lock them on the lawn out
in front of your house with a For Sale sign on them and drivers passing by
might stop and buy them. Holding a yard sale or taking them to a flea market
for sale is another option. Many people also sell bicycles on eBay,
the popular auction website. I’ve sold many things on there and it works well.
Another way to sell bikes is to simply tell everyone you know that you have
some bikes for sale. When you’re buying groceries, getting a haircut, at the
post office, etc. — everyone and anyone you run into who you know, you
can strike up a conversation and ask if they know of anyone looking for bikes.
You can also print up 3 x 5 cards with descriptions of the bikes on them and
your phone number and put them up on bulletin boards around town. Bike shops
often have these BBs for ads like this. But, you often also find them at supermarkets
and at bus stops and at colleges and High School campuses.
(Back
to Bicycles index)
LandRider
(formerly known as the Autobike)
I’ve seen those infomercials on late-night TV about
the LandRider (formerly called the Autobike), a bicycle that shifts automatically.
Have you tried it? Do you think it’s any good? It sure looks good
on TV.
Yes, I tested an Autobike a few years
ago and found it interesting. Since that time, Autobike went out of business,
but the invention is still available and now sold as the LandRider. These
bikes have better frames and components than what was used on the Autobike,
however, they’re also more expensive.
The unique shifting system on these bikes operates off centrifugal force.
The derailleur has a third jockey wheel attached to a floating disk on
the wheel. And there are 3 sliding wheel weights connected via telescoping
plungers to this disk.
As the wheel accelerates or slows, the weights spread or contract, the
plungers extend or return, and the derailleur shifts the chain down or
up the freewheel. Though the drivetrain adds heft (total bike weight of
the model I rode was 35.25 pounds; LandRider models are around 30 to 32
pounds) it’s reasonably simple in design and works okay. Shifting
is driven by wheel movement and speed so you don’t even have to
pedal for shifts to occur. Which means you always start out in a nice
low gear.
Whether or not you’ll appreciate the LandRider depends on what you’re
looking for in a ride. In my opinion, experienced riders won’t like
the weight; and the somewhat clunky and noisy shifts. They also won’t
like not being able to select the gear they want to use (the LandRider
determines what gear you’re in).
Beginners and casual pedalers, however, might appreciate the LandRider’s
user friendliness. However, there are alternatives that shift much more
smoothly that I’d recommend trying before buying a LandRider.
These bicycles are equipped with Shimano’s Auto-D drivetrain, which
is a computer-operated 4-speed system. Many bicycle manufacturers offer
bikes with this system. I’ve ridden a few and the shifting is as
smooth as the shifting in my automatic Toyota, not clunky at all. Also,
these bicycles are built with high-quality components whereas the Autobike/LandRider
is made of entry-level-quality components.
I would also recommend trying out bicycles equipped with Shimano Nexus
7-speed components, which provide more gears than the Auto-D. These bikes
do not shift automatically, yet they’re so easy to shift you won’t
have any trouble at all riding the bikes. In fact, you’ll love how
easy they are to operate.
Plus, there are a wide variety of Nexus-equipped bikes available so you
can choose from many models versus the limited selection of LandRiders.
And, unlike the LandRider, they’re sold in bicycle shops where you’ll
receive expert advice and set-up with your new bike.
(Back
to Bicycles index)
Finding a highwheel
bike
I’m wondering if you can help me find a new highwheel
bicycle, you know, the ones based on antique bicycles with huge front
wheels?
You can purchase a great reproduction
of a highwheeler from Mesicek.
This is a very nice modern highwheel. They faithfully copy the details
that made highwheelers so popular at the turn of the century and they
have a very nice price, which I believe is less than $3,000.
If you would like to find an original highwheel, I would recommend joining
the antique bicycle club called The
Wheelmen. Once you join this club, you’ll start receiving the club
newsletter and in it you’ll find ads for highwheels, which you can buy.
Keep in mind that antique bicycles are quite valuable. You can expect
to pay 3,000 to 7,000 dollars depending on what you find. However, most
of these bikes are true antiques, which is why they cost so much.
You can also search eBay.com for "highwheel" and sometimes you’ll
find bikes for sale on there. However, there are people on there selling
junk and asking way too much, so you have to be very careful. If you spot
something and would like some advice, feel free to email
me.
(Back
to Bicycles index)
 (back
to top)
(back
to top)
Integrated
headsets
Tire
sizes
Sling seat
Integrated headsets
What
do you think of the new-style integrated headsets?
I don’t have a lot of experience with modern integrated headsets, the new minimal design that build the cups into the headtube of the frame. But, the design has been around for a long time. I’m familiar with Bianchis and other
European bicycles that used internal headsets in the sixties. The bottom
line is, if the frame is made carefully and the headset is high quality, it
can work as well as any headset. And, it does clean up the looks of the
front of the frame. So, I don’t think there’s anything wrong with the design
as long as the company did its homework.
(Back
to Components index)
Tire sizes
I
am need of new tires. The rims are Mavic, but I’m confused about sizing. The
tire is a tubular. I think the size is 27 inch. How to I make sure I get the
right size?
If
you have a tubular tire (also called a sew-up), and you know that you have
full-size wheels (either 700c or 27 inch), you need a 700c tubular. Tubular
tires only come in a few sizes and the most common is the 700c. A tubular
tire is a unique type of tire that usually has a tube sewn inside. This gives
the tubular a round cross section and means that it must be glued onto the
rim.
700c and 27 inch are actually different sizes (27 inch is slightly larger
diameter than 700c), but they’re often confused because they’re so close and
they’re both found on road bikes — or have been over the years. These
days, the common road-bike wheel and tire size is 700c. But, people still
sometimes mistakenly refer to it as 27 inch, which was popular 25 to 30 years
ago.
So, the bottom line is, if you get a tubular called a “27 inch" or "700c,”
it will be the same size and it will fit your wheel just fine. The size that
you don’t want is “650c.” That size will be too small for your wheels. If
you have something besides a tubular tire (if your tires aren’t glued onto
the rims, you don’t have tubulars), to determine the size simply look carefully
at the sidewalls. You’ll find the tire size marked there if you look closely.
(Back
to Components index)
Sling seat
I’ve seen pictures of an odd bicycle
seat that looks like a sling, sort of like a lawn chair. Do you know about
these seats and whether they’re available?
Here’s a picture of the original sling saddle as built and ridden
by the inventor and noted  cyclist,
Dan Henry. For a while this seat was sold as The Bummer, but, as far as
I can tell, it’s no longer available. cyclist,
Dan Henry. For a while this seat was sold as The Bummer, but, as far as
I can tell, it’s no longer available.
So my recommendation is to make your own. The construction is pretty straightforward
and shouldn’t cost much. All you need is a stem and drop handlebars
that fit together. You could use whatever’s available, maybe stuff
purchased at a flea market or swap meet or even at the dump.
Assemble the stem and the bar as shown in the photo and cut and sew some
dungaree material or canvas or nylon webbing or what have you, to form
the sling that slips over the flat portions of the handlebar. The tricky
part will be making the stem fit inside the seat tube on the frame. You’ll
probably have to shim it. There are many ways to do this.
The cleanest is to get a piece of tubing and turn the outside and inside
diameters down, the former to fit the frame and the latter to fit the
stem, which is now the seatpost. Then slot the tubing shim you’ve
created so when you tighten the seatpost binder it’ll grip and hold.
I imagine a machinist could make such a shim for an hour’s worth
of labor. Or you could just fashion a shim out of anything you might have
around the house. It shouldn’t be too difficult to find something
that works.
(Back
to Components index)
 (back
to top)
(back
to top)
Tank
for a 1952 Hawthorne
Collecting nameplates (head badges)
Sears chrome 3-speed
Speedwell Titanium
Tank for a 1952 Hawthorne
Would
you know where I could find the right-side or complete tank for a 1952-3 Hawthorne
bike?
Try
the various classic bike sources such at the big swap meets, clubs and the
shops that sell old bike stuff. Here are a few good sources. Best of luck
in your search: National
Bicycle History Archive. Classic
Antique Bicycle Exchange. Memory
Lane Classics Bike Shop. Ann
Arbor/Saline Swap Meet.
Also, be sure to regularly check eBay,
the online auction site where you’ll find just about everything if you keep
looking.
(Back
to Collectibles index)
Collecting nameplates
(head badges)
How
do I determine the value of a nameplate or its authenticity. Any pointers
or suggestions will be appreciated because I’m starting a collection.
Value
is pretty much in the eye of beholder. In other words, a nameplate is only
worth as much as someone is willing to pay for it at the time. Over the years,
I’ve seen them sell for between $1 to $100. I try to pay no more than $25
per nameplate, but sometimes I have to to get what I want. It all depends
on what it is and who’s buying it. If someone needs it for a restoration,
it will go for more than if someone wants it for a collection. It’s best to
figure out what type of nameplates you like and how much they’re worth to
you and then resist the urge to overpay for them because if you can be patient
you’ll almost always get another chance to buy the same nameplate and you
can usually get it at the price you want to pay.
As far as I can tell, there aren’t
more than a handful of real nameplate collectors out there. Still, if you
search for nameplates on ebay.com, (also search on “head badge”) you’ll see that there are quite a few for
sale and that there are quite a few of us bidding on them, too. That’s a good
place to see what’s available and get a feel for prices, too.
As far as authenticity, it’s not that
big a problem. Most of the plates that are out there are the real deal. It’s
very rare that I run across anything fake. They’re not worth enough for it
to be worthwhile for people to make duplicates. You will see reproductions
of some obsolete brands, though, but in my opinion, those aren’t fakes, they’re
just reproductions of original plates. That keeps the nameplate "alive"
and in my opinion is a good thing. Though, I’d value the genuine plate more
than the reproduction model.
(Back
to Collectibles index)
Sears chrome 3-speed
I have a Sears chrome bike, 3-speed. This was given to
me back in 1966. It is missing the headlight and rack and is in need of
a good cleaning and no doubt there will be some pitting in the chrome.
My question is if this bike is worth anything?
Well, it all depends on what your idea
of value is. It’s certainly worth something to someone, but you never
know how much it’ll bring until you find that someone who’s interested
in your bike.
Without seeing the bike, it’s hard to estimate what it might sell for.
But, used 3-speeds typically go for from $50 to $250, depending on model,
condition and equipment. The best place to list bikes for sale is on ebay.com
This site is watched by collectors everywhere and bikes tend to sell for
fair value on there since so many people are bidding. So, you could take
a photo of your bike and put it on ebay and test the market. If you don’t
want to let it go for less than a certain price, you can put a reserve
on it. That way, you won’t sell it unless you get what you want for it.
You can also search on eBay to see if similar bikes are for sale to get
an idea what yours might bring. Just visit the site and type “Sears bicycle”
or "3-speed bicycle" in the search box and see what bikes are
for sale. You should do this about once a week because every week the
bikes for sale change. I think you’ll probably turn some bikes up and
might even get lucky and find the same bike as yours for sale. Then you
can watch the auction to see what it sells for. Good luck!
(Back
to Collectibles index)
Speedwell Titanium
I am seeking information regarding the availability and
value of a Speedwell titanium bicycle. During my racing years, I had the
pleasure of riding one in many USCF time trials and love the bike. I believe
very few of these frames were built in the 1970’s and were famous for
their workmanship and light weight. Are you aware if any of these are
available and what the asking price would be? I am getting nowhere with
any of the links that I have been provided with. Do you have any information?
I have only seen a few Speedwells, but
always thought they were beautiful. I’m fairly certain that it’s a very
rare frame. If I was looking for one, I’d check ebay.com regularly. I
just checked and didn’t find anything. But, I’ve been amazed what turns
up on there. The trick is checking about once a week and not giving up.
You might also reach out to some of the vintage lightweight collectors
out there. One who’s knowledgeable and nice is Chuck
Schmidt. I don’t know how much he knows about Speedwell, but he’s
a good guy who is connected in the hobby and he might have some ideas
for you on where to find one.
You might also try Jim and Susan Cunningham at Cyclart.
They paint bicycles and have been in the vintage lightweight hobby for
a long time. They see lots of bikes and go to swap meets, etc. They might
be able to give you some leads, too.
I also found this page that has some
info and pics of Speedwell:
(Back
to Collectibles index)
 (back
to top)
(back
to top)
Tight Dura-Ace
bottom bracket
I just bought a beautiful Italian aluminum time trial
frame from a well-known shop. I put in a new Dura-Ace bottom bracket.
The cups went in very tight. After assembly, the spindle would barely
turn. Even with just the fixed cup installed, the spindle was so tight
it couldn’t be pulled away from the fixed cup.
The BB worked fine until it was installed. It appeared to me that the
threads in the shell were too shallow, compressing the cups slightly.
(I used to run a pro shop in a prior lifetime and installed a lot of older
style bottom brackets. I never considered BB cups as being compressible
but Dura-Ace cups are so thin and light I’m assuming they are somewhat
deformable. Simultaneously, I also put a new Dura-Ace BB on my road bike....
it went in perfectly; the only noticeable resistance is from the bearing
grease.)
I took the frame back to the shop, they put a new Dura-Ace bottom bracket
unit in and told me that they cleaned up the threads. I got the feeling
they were not being totally forthcoming with me about the problem. The
bottom bracket is still so tight that the spindle barely will turn and
it’s impossible to adjust it to have any bearing float... it’s
tight even if the adjustable cup is backed out half-way. The cups still
thread in very tight. In addition to a lot of unnecessary friction from
the bottom bracket, I’m afraid the bearings will fail fairly quickly.
My guess is that the bottom bracket needs to be completely retapped to
allow the cups to go in easily. It’s not a question of non-parallel
cups as the problem exists only if one cup is installed. Any advice?
Your situation sounds to me like a frame
bottom-bracket problem. It’s very unlikely that the problem is originating
with the Dura-Ace bottom bracket. I think it’s the frame because
those BB cups should go in easily or with a little resistance, but nothing
that requires a lot of force to overcome. And, in my experience, it’s
fairly common for manufacturers to do a poor job of machining threads
in bottom bracket shells. Depending on how the frame was constructed,
it’s possible that a lot of heat affected this area, too (because
it’s the junction of so many tubes). And aluminum tubes are usually
heat treated after welding, which is another process that can warp and
distort things. These treatments can make a bad threading job become nearly
unusable.
I would suggest chasing the threads and then checking to see if the cups
go in easily. If not, the problem may be that the taps on the chasing
tools are old and dull and not doing a good job (they’re expensive
so shops don’t replace them all that often, usually). Another possibility
is that the mechanic did not run the taps in far enough because they were
so hard to turn and he gave up too soon. You have to complete the job,
tapping the entire thread path. And, of course, it’s very important
to use lots of cutting oil, to work slowly, and to back the taps out every
couple of turns to brush off the metal filings that can jam things up
and prevent the taps from cutting a nice thread.
It takes some muscle to do this right if the frame is as badly "under-threaded"
as many I’ve seen. I would usually have another mechanic hold the
frame while I turned the taps and slowly but surely, we’d cut nice
new threads. When the threads are right and deep enough, the cups will
thread in nicely and the bottom bracket should turn beautifully.
You’re right in thinking that if the spindle is too tight to turn
by hand that it will wear prematurely. It definitely will. Plus, you’ll
be working much harder than you should to pedal the bike, of course. So,
I’d have the shop try again. If you think they don’t have
the expertise to do the job, you might simply bring the frame to a better
shop and have them tap the BB for you. It shouldn’t cost too much.
(Back
to Repairs index)
Seat won't fit
I
recently upgraded my old Vitus 979, and I thought it deserved a nifty new saddle.
My last saddle was a Terry Liberator, and I got a Terry Damselfly to replace
it. The problem is that the rails on the Damselfly are narrower than the clamp
on the seatpost. I thought that rail width was a standard thing. Is it? Do they
make replacement clamps or do I need a new seatpost too? I just never saw any
mention of rail width or clamp width, in any catalogs, magazines, or books,
just seatpost width.
You’re
correct about saddle rails usually fitting all seatposts. The exception are
rails that are larger diameter, but these are pretty rare. So, I think what
you have is a seat where the rails got pushed together a little bit at some
point, maybe when the seat was shipped or handled. If this is the case, they’ll
only be a little narrower (1/2 to 3/4 inch) than the old seat. Hopefully they
didn’t actually get bent, which is another possibility. You can look for bends
by checking for abrupt bends on the rails. They should have consistent symmetrical
bends just like what’s on your old seat.
Assuming that the rails are only pushed out of position, you should be able
to put the seat in the clamp and then pull or pry the rails into position. If
you can just get them close, as you tighten the seatpost, the rails will fit
into the grooves on the clamp and it will hold them in place. If the rails are
actually bent, you should return the seat and get a good one.
(Back
to Repairs index)
Loose stem
I
recently bought a new Wildwood and after a few rides the handlebars and neck
that affixes them to the tube that the fork is mounted into is loose? How do
you tighten this assembly?
I went to Diamondback’s website for a look at the stem on the Wildwood and it shows a quill-style adjustable stem. This type of stem could loosen several ways and from your description I can’t be sure which part loosened, but perhaps the following advice will allow you to troubleshoot and tighten the correct part.
The stem is held tightly inside the fork of the bike by a wedge at the base
of the stem. There is a recessed Allen bolt accessed through the top of
the straight part of the stem that goes into the fork. It usually takes
a 6mm Allen wrench. When you turn this bolt clockwise, it pulls the wedge
up that’s inside the fork and this wedge jams against the bottom of
the stem and the inside of the fork and holds the stem in place. This keeps
the stem tight and prevents it from moving left and right in relationship
to the bike when you turn the handlebars to steer the bike.
On your stem, however, there’s another bolt that I believe might be what has loosened and that’s near the middle of the stem on its side. This bolt is loosened to allow changing the angle, height and reach of the stem. If this loosens, the stem won’t swivel side to side, but rather up and down, which will allow the bars to change positions, which is dangerous. There are different types of adjustable stems and I’m not positive which type you have. I think it will require a 6mm Allen wrench, though, to tighten it. You’ll have to check to see which side of the stem to tighten. If you can’t see the bolt, there may be a plastic cap covering it, which you can pry off with your fingernail or a small screwdriver to get at the bolt.
If this part is what’s loose and you can’t figure it out, call the shop where you bought the bike and ask them how to tighten it, or bring the bike in and they’ll do it right away for free. It shouldn’t have loosened so quickly and they’ll want to make it right ASAP.
The other part that can loosen is the handlebar clamp, which is on the very top of the stem, but I expect this isn’t your problem. If it is, to tighten the bars, just snug the bolts holding the handlebars in place with a 5mm Allen wrench.
(Back
to Repairs index)
Derailleur trouble
My Raleigh mountain bike won't go onto the smallest gear
and the chain jams up when I backpedal. Is this something I can fix?
It
sounds to me like your rear derailleur is bent because that’s the
most common reason a bike stops shifting onto the smallest cog. Another
likely symptom of this condition is the chain not staying on a cog when
you backpedal, which happens because the derailleur is no longer correctly
aligned beneath the cassette (the cluster of gears). What usually causes
the problem is the bike falling over. The rear derailleur, being one of
the most protruding parts on the bike, usually takes the hit and gets bent
inward.
Then it won’t shift onto the small cog and will sometimes jump over
the top cog into the spokes (if it’s bent badly enough) when you go
to shift into your largest cog. You can check to see if it’s bent
by standing behind your bike and sighting the derailleur to see if it’s
parallel to the cogs. It should not be at an angle. An imaginary straight
line through whatever cog the derailleur is under should bisect the derailleur
pulley wheels. You can see right away probably whether the derailleur is
bent or not.
If it’s bent as it sounds, you’ll have to pull it back out.
If it’s badly bent, you’ll want to leave this to a shop. Also,
leave it to a shop if you have an aluminum frame because these can have
delicate derailleur hangers (the part the derailleur is attached to).
However, if it’s only bent a little, you can pull it out by wrapping
a rag around the derailleur (so you don’t cut your hand) and grabbing
it with your hand (get your fingers behind the derailleur). Pull out gently
to see what it takes to pull the derailleur back into place.
Usually, the part of the derailleur that is bent is the tab that attaches
it to the frame and it doesn’t take a lot of muscle to pull this back
out. Also, the frame has a memory and it will want to go back to where it
was. So just pull gently and sight again to check progress. If it doesn’t
move, pull with a tiny bit more force. You’ll get a feel for this
quickly and with luck you’ll pull the derailleur back into alignment
and solve your shifting problems
If you’re worried about damaging your frame further, just bring it
to a shop and have them fix it. They have special alignment tools so they
can get it perfect, and they’ll double-check that the derailleur is
still in good shape; so it’s worth the expense.
(Back
to Repairs index)
Drivetrain glitch
My bike has started acting strange. When I pedal, there’s
a kind of skipping sensation and clicking, clunking sound. It feels like
something catches and lets go or like something is about the break. This
seems to happen no matter what gear I’m in and it’s driving
me nuts! What’s up?
Skipping
that happens on all the gears is usually caused by a stiff link in the chain.
If you have a stiff link, it’ll really mess up pedaling unless you
happen to get lucky and it goes away on its own, as sometimes happens if
you apply a little lube and ride a bit.
You can check to see if you have a stiff link by standing next to the bike
and crouching down and pedaling backwards slowly with your hand. Now watch
the chain carefully as it travels through that S-shaped part of the rear
derailleur (back by the cluster of gears on the rear wheel). As you pedal
backwards, the chain should pass through there smoothly with no hiccups.
If the chain seems to jam or jump or bind at some point as you’re
pedaling it by hand, it’s the stiff link getting jammed up as it goes
through. If you discover a stiff link, get it fixed and your shifting problems
will go away. You can often loosen a stiff link by grasping the chain on
either side of the bad link and flexing the link sideways. But if it’s
a stiff link due to rust/corrosion, you may have to replace it, which takes
a new pair of links and a chain tool, so you may want to leave this to the
shop.
(Back
to Repairs index)
Rust
Should I worry about rust on my bicycle?
How
concerned you should be about rust depends on what type of bike you have
and where you live and how you use your bike. The worst-case scenario would
be an all-steel bike, ridden regularly in the rain, stored outdoors in a
town next to the ocean. That bike would last about 3 months before turning
to rust dust.
On the other hand, if that same bike were cleaned, waxed, and lubed after
every ride and stored inside, it might last a lifetime. If you have a steel
frame, any steel frame, it’s protected by paint on the outside. As
long as you keep this protective paint intact, rust cannot attack the frame.
Now, if there are chrome panels or the dropouts are chrome plated, the rust
may attack these areas. The best preventative is to keep the frame and chrome
waxed with a car-type or bike-type wax (check shops). This is a twice-a-year
job if you don’t ride in the wet too much.
The trickier thing is to prevent rusting on the inside of the frame, which
happens to have no paint on it. Ideally, you’ll get some free-flowing
lubricant in there such as LPS or even motor oil. Some folks love to use
linseed oil. J.P. Weigle a frame builder in CT offers a frame protector
called Frame Saver that works very well.
The only thing with these products is you need access to the holes in your
frame to get the stuff in and this requires removing parts. It’s also
necessary to suspend the frame and rotate it after installation so the lube
will run all the way down the tubes. Anyway, you get the idea. You can protect
the insides with a little work, too.
If you have a carbon, aluminum or titanium frame with high-quality parts,
you needn’t worry about rust much at all. About the only thing that’s
susceptible is the chain and anchor bolts on the brakes and derailleurs
which are steel. But these are thick steel that won’t be affected
much by surface rust and you can easily scrub it off with steel wool. Of,
if it bothers you, you can keep these parts lubed so no rust can attack
them.
(Back
to Repairs index)
Chain falls off
I’m having trouble with my son’s bike. It’s an 18 speed and when he tries to change gears the chain keeps popping off! We have no bicycle repair shop where we live, so I’m in a jam. Can you help me out?
You
didn’t mention if the chain is falling off on the front or rear. It’s
more common for it to be falling off the front (chainrings). If that’s
the case, one thing to check is whether or not the chainrings are bent.
When you turn the crankset (what the pedals are attached to), the chainrings
should be nice and round with no side-to-side wobbles. If the chainrings
are bent, they’ll act like a bent railroad track and the chain will
get derailed as the bent section comes around. The chain will just fall
right off.
Another possibility is that the bearings in the crankset might have loosened. This would let the entire crankset wobble left and right in the frame. If this happens, it’s just like if you had a bent chainring. Because the crank wobbles left and right when you pedal letting the chain fall off. If you have this problem you need to adjust your bearings to eliminate any side-to-side play.
If you’re lucky, your chainrings will be nice and straight and there
won’t be any wobble in your crankset bearings (also called bottom-bracket
bearings). If that’s the case and the chain falls off on the front,
it’s probably a front-derailleur adjustment problem. Front-derailleur
adjustment is a little tricky so I’d recommend you follow the steps
in my article. Just read the article and compare
your adjustments to what I describe in the article. You’ll probably
be able to stop the chain from falling off with a minor adjustment. It will
need either a slight turn of the limit screw or a slight adjustment to make
the front derailleur cage align correctly with the chain so it can’t
push it off.
I haven’t said much about the rear cogs because it would be unusual
for this to be the problem unless someone has messed around with the adjusting
screws on the derailleur or if the bike has been in a crash or someone beat
on it. Here are instructions for adjusting rear
derailleurs.
(Back to Repairs index)
Changing frame spacing
I have a Reynolds 653 road frame built for me in 1989 by Condor in the UK. I was living outside London at the time. Even the forks are 653. I’m in a quandary around the new gearing technology. Can I get the rear triangle stretched to accommodate a new hub and cassette, or should I just bite the bullet and buy a new frame?
You
needn’t worry about your frame becoming obsolete. It probably is set
for 7-speed spacing, which means that it measures about 127mm between the
inside faces of the rear dropouts. Modern spacing (Shimano & Campy 9 & 10
speed) rely on 130mm spacing. This means that there’s only a 1.5mm
spacing difference per side between your classic frame and modern frames.
Most people don’t even worry about this and just pull the new wheel in. Depending on the design of your dropouts and the components you choose, you might not even experience additional effort to pull the wheel in. So, that’s the easiest approach.
If, however, you were to try a modern wheel in your frame (you could simply visit a bike shop and ask to insert a new wheel into your bike to see how easily it fits) and find that it resists, the solution is to have your frame reset to 130mm. This is a relatively simple alignment procedure that any decent shop can handle and should charge about 30 minutes labor for.
It’s usually done by removing the wheel, standing behind the bike,
grabbing a dropout in each hand and pulling. Then the alignment is checked
to ensure that the dropouts moved equal amounts and if not, the mechanic
fine-tunes the right or left side until the spacing measures exactly 130mm
and the dropouts are equidistant from the centerline of the frame.
An easy way to check is with a length of strong thread or fishing line. Tie this to one dropout, pass it around the head tube and back to the other dropout. Pull to remove any slack and tie the thread to the same spot you attached it to on the other dropout. Now you can measure from the thread to the seat tube on one side and then the other. You know the dropouts are correctly positioned when the measurements are identical.
Keep in mind that this alignment technique works best on steel frames.
(Back to Repairs index)
Chain keeper
I have been reading that it is apparently a fairly common problem for the Shimano triple front derailleur set-up to cause derailment of the chain onto the bottom bracket when shifting to the small ring under load. I see that there are two devices which bolt onto the downtube to keep the chain on the small chainring. Do you have any experience with this?
I’ve heard the talk about dropping the chain and seen the recommendations for the chain keepers, but I believe that if you make a good
derailleur adjustment and your frame is aligned correctly and your chainline is correct, you don’t need to add these devices. I don’t think you’ll see them on racers’ bikes, either.
In my opinion and experience, most dropped chains come from incorrect derailleur adjustment and bad shifting procedures (shifting under load is bad practice on any bike). If you shift with finesse and carefully adjust your derailleur and all the things I mentioned above are spot on (chainline & frame alignment), I think you won’t need to add anything to keep the chain on. So, I would recommend trying it without anything and not adding a keeper unless it was absolutely necessary.
Keep in mind that front derailleur adjustment
is quite tricky and tiny adjustments can make significant improvements
in shifting.
(Back to Repairs index)
Campy shift cable
My rear shifter inner cable is shot. A strand came through the hood and poked me in the finger. The shifters are Campy Ergopower and about
2.5 years old. I don’t have too many miles on the bike, but it has all been climbs and descents including two Death Rides. Can you tell me where to order cables from? And should the housings be replaced also? And, should I replace the brake cables and housing?
Usually
you can replace just the damaged cable and you’ll be good to go. That
cable gets a ton of use, but I’m still surprised it wore out so soon.
So, when replacing the cable, look closely at the ends of the housing to
ensure that there aren’t any burs that are rubbing the cable and causing
it to wear prematurely. The ends of the housings should be completely open
and if you slide the cable in and move it in and out there should be no
friction. If you find a bur, you can remove it with diagonal cutters or
file it off. You shouldn’t need a new piece of housing unless yours
got crimped or cracked, which would be unusual unless the bike was crashed
or abused in some way.
As far as a replacement cable goes, the easiest thing might be simply to
call your local bike shop and ask if they have a Campy Ergopower inner shift
cable in stock. I bet you’ll be fine replacing that one cable because
it would be pretty strange to need to replace cables after only 2.5 years
of riding... unless you were logging monster miles. Campy cables are excellent,
so I’d recommend sticking with original equipment even if it costs
you $10 to $12 for the cable.
I don’t know if you’ll find individual cables online. The mail
order places might have them, but they sometimes stock only the more expensive
complete sets, which you don’t need.
(Back to Repairs index)
Getting the noodle back
I just bought a new mountain bike and I followed your easy instructions on how to fix a flat. As it turned out, everything was going smoothly until I tried to reattach my brakes, i.e., putting the noodle back in its holder. I can’t see that I have made any mistakes that should cause this but for some reason I can’t get the brakes close enough together to slip the noodle back in. Please help if you get the chance.
What probably happened is that the cable housing came out of one of the stops on the frame. When you release the cable at the noodle, it creates slack and sometimes the housing will come out of a stop and sit on top of the edge of the stop. This will in essence make the cable too long for you to get the noodle back into its holder.
Look along the length of the cable and at each point where the housing enters a stop (or even where it fits into the noodle), and check to see that the housing is seated fully and then try again. Sometimes the housing will come out of the lever, too, so check that also. When the housing is seated completely, the noodle should slip into its slot without too much difficulty.
(Back to Repairs index)
Cannot coast
When I ride my bike I can’t coast because when I stop
pedaling, the chain gets pushed forward and develops slack. So, I have to
start pedaling right away to take up the slack and keep up with the speed
of the rear wheel. Also, when I walk alongside the bike pushing it, the
pedals turn around. What’s going on?
It
sounds like the mechanism inside your cassette (also called a freewheel)
on your rear wheel has corroded. The cassette is that thing that has all
the sprockets on it. When it gets rusted or corroded inside, it doesn’t
freewheel when you stop pedaling, which pushes the chain forward causing
the problems you’re having.
If you’re lucky, you’ll be able to get it working again by spraying
some WD-40 or similar light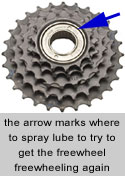 lubricant into the bearings. This is tricky because the bearings aren’t
visible. They’re inside the body of the cassette. You’ll have
to lean the bike on its left side and look closely and see if there’s
a crack between the part that you can move backwards and the part that remains
still on the hub as the other part moves. All you need is a tiny gap. When
you find it, spray the WD-40 in the gap enough to work some lube around
the perimeter. Let the bike rest on its side a bit. Once gravity has drawn
the lube into the cassette body, give it a try and if you’re lucky,
it won’t bind anymore.
lubricant into the bearings. This is tricky because the bearings aren’t
visible. They’re inside the body of the cassette. You’ll have
to lean the bike on its left side and look closely and see if there’s
a crack between the part that you can move backwards and the part that remains
still on the hub as the other part moves. All you need is a tiny gap. When
you find it, spray the WD-40 in the gap enough to work some lube around
the perimeter. Let the bike rest on its side a bit. Once gravity has drawn
the lube into the cassette body, give it a try and if you’re lucky,
it won’t bind anymore.
If you can’t find the gap on that side of the cassette, lay the bike
on its right side (carefully.. so you don’t bend the derailleur) and
look for the gap on that side of the cassette (its back side). You should
see a gap on one side or the other that you can spray lube into. The lube
should go into the cassette, not the hub bearings (that’s closer to
the axle). Don’t get the lube in the hub bearings because it’ll
wash the grease out of them and you don’t want that.
Sometimes cassettes are defective, but corrosion is a more common cause
of the problem you have; particularly if a bike is stored outside or ridden
in the rain and then stored.
(Back to Repairs index)
Routing the chain
I repainted my bike, and therefore had to take all the parts off and then put them back on. It all went pretty well until I got to the rear derailleur.
I’m not sure what’s wrong with it, nor if it functioned before I started repairs, but it just doesn’t stretch out to hold the chain. When I compare to other bikes... the spring seems to be pulling the chain up on my Peugeot, while it stretches the chain down on the other ones. I really don’t know what to make of this.
The
problem with the derailleur is the way you have the chain routed through
the pulleys. The chain needs to form a backwards S. Here’s
a link to a page with a picture of how it should look. Check step 2:
To get your chain into the right position, loosen and remove the lower pulley bolt and remove the pulley. That will let you move the chain into the correct position. Then reinstall the pulley. To keep the spring tension from making it hard to put the pulley back in, lift the chain off the chainring and rest it on the frame. Then, when the pulley is back on and the chain is correctly routed through the derailleur, just lift the chain onto the chainring again.
(Back to Repairs index)
Upgrading to QR axles
I’ve got an old bike, a Nishiki with a chromoly steel
frame, that I’m attempting to switch wheels on. I want to upgrade
to wheels with quick releases. However, the replacement QR axle measures
9mm and won’t go into the front dropouts! The old axle measures about
8.5mm or so (solid axle, steel rims, etc.) The slot measures just about
9mm, but it just won’t go in. What would your recommendation be: 1)
file flats on the axle threads to allow it to just drop in place? OR 2)
file the dropout openings gently to allow the axle to drop in?
You can file either, however, it’ll make life easier if you file the dropouts because if you file the axle, you’ll always have to line it up to install the wheel, which can become a pain when you’re in a hurry, at night when you can’t see, etc.
So, I’d file the dropouts. But, do this carefully. You want to remove
material only on the leading or trailing edge; but carefully avoid the top
of the slot because filing here will mess up wheel centering and could cause
serious problems.
I’d look at the dropouts and see if one side or the other has more material and file on the side that has more to spare. If the dropout looks weak or too thin to remove material, just file the axle as that will be safer than risking weakening your dropouts. Quality dropouts can handle some filing, though.
(Back to Repairs index)
Basic headset adjustment
What is the process of tightening a headset. Top nut, bottom nut, top nut or vice versa? I don’t remember.
Assuming you have a threaded headset rather than the new-style threadless headset, you first make sure the top nut (locknut) and any locking
nuts beneath it, are loose. Then you thread the cone (bottom nut) clockwise until it stops using only your hand or light pressure if you’re using a wrench.
Then, you tighten the top nut against the cone. Next, you turn the fork slowly to feel how smoothly it turns and you push and pull on the fork to feel for play (there should be no play). If it feels right, you put a wrench on the cone and another wrench on the top nut and you turn the cone counterclockwise while turning the top nut clockwise to tighten your adjustment securely. The parts shouldn’t move much if at all. You’re just locking the adjustment so it won’t change when you’re riding.
Sometimes you have to try a few times to end up with the right adjustment because securely tightening the nuts against each other will effect the bearing adjustment. But, within a few tries you should be able to make a nice adjustment.
(Back to Repairs index)
 (back
to top)
(back
to top)
Shifting
tips
Heart-rate
training
Cadence
Shifting tips
I just got a new bicycle and I’m bewildered by the shifting.
Can you give me some simple pointers?
There are a couple basic things to keep
in mind shifting bikes: One major thing is that while it’s true that you
have to pedal in order to shift, it’s important that you not pedal with
a lot of force. When you start to make a shift, you should always ease
off on the pedal pressure, let the chain finish shifting and then you
can start pedaling as hard as you want again.
Also, if you’re confused about the gearing, it can seem difficult to use.
Basically, the gears are just there to provide you a way to adjust the
effort required to pedal the bike. As you’re riding along, you’ll notice
that it’s either too easy, too hard or just right to pedal. When it’s
just right, you’re happy. When it’s too hard or too easy, you should shift.
Now, every time you decide to shift, you decide if you need to make a
big difference in how easy or hard it is to pedal or a small difference.
For small adjustments in pedaling effort, you should move the right shift
lever. For major changes in how hard or easy to pedal it is, you move
the left lever.
Good cyclists, shift constantly — maybe 100-plus times on a rolling
15 mile ride. The more you shift, the more often you fine-tune the effort
to pedal and by doing this, you can save energy and roll along very efficiently.
So, don’t be afraid to shift and shift a lot.
(Back
to Riding index)
Heart-rate training
I've
just purchased a heart-rate monitor. Can you give me some tips on using it?
A
heart-rate monitor is a helpful tool because it gives you a way to gauge effort
and recovery and track your fitness progress. Depending on your fitness goals
you may want to thoroughly read up on using a heart-rate monitor. Most come
with manuals, which provide the basics. You can find additional information
here.
(Back
to Riding index)
Cadence
I’m wondering how fast I should pedal? I know the trend
is to keep a higher cadence, but I’m more comfortable pedaling slower.
Is this okay?
If you’re comfortable pedaling slightly
slower, go ahead and pedal slower. Most people find however, that the
more they ride, the more likely it is they just naturally pedal faster.
I’ve been getting faster over the years but I still pedal about 90 to
100 revolutions per minute (RPM) most of the time. That’s just what feels
natural to my legs. And that’s what you should do, too. If it feels natural
then you’re doing okay. Unless of course, you’re suffering knee pain,
or something.
That would indicate that you’re lugging your engine and that’s not good.
Ideally, you’ll ride an RPM that allows your legs to feel fresh over any
terrain with the gearing that you have on your bike. If that’s the way
it is for you now, you’re probably just fine.
If you want to try faster pedaling to see if it’s any better, just shift
into the next lower gear whenever you think of it. By getting in this
habit you’ll find you have to pedal faster. Then you can see if your legs
feel better on or after rides. If so, then you might make an effort to
keep riding in lower gears to increase your cadence. You can also train
yourself to pedal faster by leaving your bike in lower gears than you’d
normally use on downhills. Then, force yourself to keep up with the gear
down the hill by pedaling like crazy. You’ll find that you can pedal a
lot faster than you might think. You’ll probably even like the snappy
feeling it gives you in the legs.
(Back
to Riding index)
 (back
to top)
(back
to top)
Bike-repair/mechanics
schools
Pedal
Extenders
Bike
storage
Which
Walkman?
Bike-repair/mechanics schools
I am going to retire at the ripe old age of 50 and would
like to start another career. Could you recommend a school for bicycle repair?
There are two good bicycle-repair schools:
United
Bicycle Institute (Oregon) and Barnett's
Bicycle Institute (Colorado). I haven’t attended either of these,
but I’ve heard great things about them. I learned mechanics by working
in shops and, in my opinion, that’s the only real way to learn (of
course, it’s important to work under a good mechanic who can show
you things). But, these two schools will teach you plenty and if you can
quickly put the lessons into practice, and you have an aptitude for bicycles,
I think you’ll be well on your way.
(Back
to Other index)
Pedal extenders
I
just recently started biking again after not riding for about 15 years. In
the interim, I broke my leg and have a slight rotation outward (a degree or
so) in my left foot. It causes the inside of my foot to rub the crank. I was
wondering if anyone sold an extension (about an inch) that I could put on
my pedal, or would I have to have something custom made?
Here's
a link to "Kneesavers"
(a better name would be Anklesavers! These are the only such devices I’m aware
of, but they’ve been around for a long time and I’ve heard good things about
them from many riders. You can even put them together to get more clearance
if needed.
(Back
to Other index)
Bike storage
I
currently live in an apartment with an outside closet — I have entertained
the idea of using hooks and hanging the bikes from the rims — but won’t this
added stress bend the rims out of true? Especially the lightweight aluminum
road bike rims?
It’s
fine to hang bikes by one wheel on a hook in your closet. The rims are plenty
strong enough to handle the weight of a bike. I’ve lived in quite a few apartments
and I ALWAYS had bikes hanging by hooks in mine.
Also, it’s really common for bicycle shops to store bikes this way because
it takes up the least amount of space. You won’t hurt the rims/wheels. The
only thing that might happen, is that if you rest the rim decal on the hook,
it can wrinkle it. So, you might be careful to avoid that. But, you won’t
damage the wheels.
(Back
to Other index)
Which Walkman?
I know you ride listening to a Walkman. Which model do
you use?
I usually ride early in the morning, which
means I ride alone a lot. So, about 10 years ago, I started riding with
a small radio to listen to music and news. I found that it was a great
enhancement to cycling and have used my Walkman on every solo ride since.
Besides the entertainment value, the radio drowns out traffic noise. That’s
one of the best things about it. Also, if you’re ever fighting a
strong headwind, the music will cut much of the wind noise... though not
all of it if it’s really windy.
Just don’t play it too loud because you want to be able to hear
enough of the traffic noise to know if danger is approaching (big truck,
etc.).
The Walkman I use is still available here.
I don’t recommend using the headphones that come with it for cycling
because they don’t fit very well beneath a helmet. Instead, I upgrade
to these
headphones, which are a necklace-style and drape over your shoulder.
They pop in your ears and stay there quite nicely. Also, this type of
headphone stores in very little space so it’s real handy for travel:
In case these links change, you can find the products by searching on
google.com for the Sony SRF-M70 (that’s the radio)
and the Sony MDR-ED228LP.
The size of the Walkman is 4.5 inches tall x 2.75 inches wide x 1 inch
thick. It’s not tiny but it fits nicely in a cycling jersey rear
pocket where it can easily be reaching for changing channels and adjusting
the volume.
Perhaps the best feature of this Walkman is that it goes from AM to FM
automatically. In other words, there are 10 presets and by hitting one
button, it will cycle through the channels even if some are FM and others
are AM so you can go from music to talk radio without having to search
for a separate mode button to change.
The Walkman comes with a clip on the back, which is handy if you like
to run/job or walk/hike because you can slip the radio over your waistband
(it goes in pants pockets nicely, too). I take the clip off for cycling
because you don’t need it if you’re carrying it in a jersey
pocket.
The unit takes 2 AAA batteries and it lasts 6 weeks or so depending on
how much you listen. It’s also durable. I’ve dropped mine
a few times and it seems to handle it just fine. I’ve also ridden
in the pouring rain for hours with no ill effect to the Walkman or headphones.
(Back
to Other index)

to the WRENCH page
|