![]()
BICYCLE
REPAIR
|
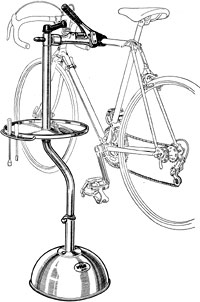
A portable repair stand makes bike washing easier |
| Sure
a clean bicycle looks nice, plus it’s also
easier to work on, smoother to ride, and will last longer. Cleaning can
also reveal faulty parts or frame defects before they become troublesome.
With this in mind, pro team mechanics clean their riders’ bikes after
each day of racing. You don’t need to wash your bicycle after every ride. You can usually spruce it up with just a moist rag and some polish (Lemon Pledge works great). But several times a year, particularly after off-road or foul-weather rides, you should wash it thoroughly. Here's how many professional mechanics do this. Please note that while it may seem like you can just blast your bike clean in seconds with a high-pressure hose, that’s a terrible mistake you never want to make. High-pressure water, especially sprayed from the side, will blast the grease and lubricants right out of the components, such as the hubs, bottom bracket and headset. And it’s a big job to get the water out and fresh grease back in. That’s why you always just trickle the water over the frame from the top when washing and rinsing. |
|
| Equipment Round up the following: |
Notes
|
| Step 1. Stand the bike up or put it in your repair stand and remove the wheels. Extract the rear quick-release skewer and tighten it in the rear dropouts letting the chain rest on it (on many frames you can insert a long screwdriver through the dropouts instead). The skewer or screwdriver lets you turn the crank without having the chain scrape the frame. | |
| Step 2. Fill the buckets with water. Put soap in one and soap and a small amount of diesel fuel in the other. The bucket with soap is for cleaning the bike. The one with fuel is for drivetrain parts. | |
| Step 3. Lightly spray degreaser on the chain, derailleurs, crankset and cassette cogs. Let it soak in a bit to disolve the grime. In general, don’t spray degreaser, water, or lubricants directly at the hubs, headset, cassette body, pedals or bottom bracket. Doing so will wash away grease from the bearings and cause wear. Always squirt from the top rather than the side. | |
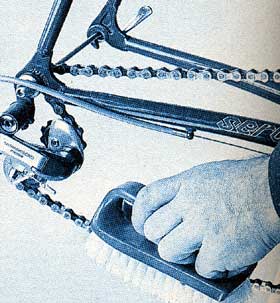
Step 4. While turning the crank, use a stiff brush dipped in the diesel fuel mixture to scrub the top and bottom of the chain as it passes over the QR skewer or screwdriver. You can also try a sponge if you prefer to hold the chain. It will probably take several revolutions of the chain to get it clean. Just keep cranking and dipping and scrubbing until it’s clean. Alternatively, some people like to use a chain cleaner tool, such as Park Tool’s. This device snaps onto the chain and includes brushes. You add solvent or lube and then simply pedal to scrub the chain clean. |
Turn the crank and brush/wipe the chain |
|
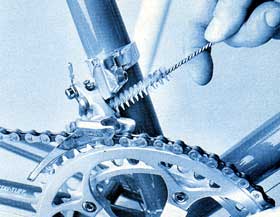
Brush the derailleurs and chainrings |
Step 5. Brush the derailleurs and chainrings with the fuel solution until they’re clean. You might also want to use a rag with a shoe-shine motion to get into the nooks and crannies and between the chainrings. If you used a chain cleaner tool (described above), you can just wipe everything clean with a rag. |
| Step 6. Drip water over the bike with the hose to wet it. Then use a clean brush to remove any dirt and dried mud from the frame (this will scratch the paint if you try to wipe it off with a rag when it's dry). | |
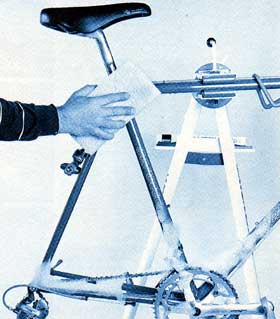
Step 7. Use the soap solution and the non-greasy brushes and sponges to clean the rest of the bike. A sponge works best on handlebar tape, cables and tubing. The brushes are for hard-to-reach spots. Be sure to clean the pedals and the underside of the seat. If you have a frame pump, now’s a good time to clean it, too, and check it to make sure it’s working well. |
Use the soapy water to clean the bike |
Step 8. Rest the rear wheel on the fuel bucket and brush the cassette cogs to clean them. Another technique that works well is inserting a rag between the cogs and using a shoe-shine motion to clean off the grease and grime. Park Tool also makes a GearClean tool with a brush on one end and a toothed plastic arm on the other. You can use the arm to clean between cogs. When you’re working, avoid getting fuel/solvent into the cassette body bearings by only applying it from above, never from the side or back of the cassette. |
|
| Step 9. Clean both wheels over the soap bucket (so you don’t have to bend over to scrub). Use the sponges and brushes on the rims, nipples, spokes, hubs, tires and cassette. While you’re cleaning the rims and nipples, look closely to see if there are any cracks in the rims by the nipples. This is a fairly common failure on heavily used wheels and low spoke-count wheels too. | |
| Step 10. Hold the hose over the top of the bike and let the water dribble over the parts and frame. Do the same to the wheels. Rinse all the soap and any remaining grit or grime off. | |
| Step 11. Dry the bike with soft rags. Use separate rags for the drivetrain and frame. Rub the rim sidewalls clean where rubber deposits have formed from the brake shoes. Acetone works well for this, but don’t breathe it or let it touch your skin or rubber parts because it’ll melt them. | |
| Step 12. You might want to wax the painted parts and any chrome parts. Wax will protect the paint and prevent chrome from rusting. Let the wax dry and then polish the parts with a clean rag. | |
| Step 13. Reassemble the bike being sure to get the wheels tight and centered in the frame. | |
| Step
14. Use a drip or spray lube to lubricate the brake and derailleur pivots
and the chain. Apply some on the cables and clipless pedal pivots, too.
If you notice any cracks or worn parts, repair and replace as necessary
before riding. |
|
| This
article is based on one I wrote for the April 1989 issue of Bicycling
Magazine. The photos are by Mel Lindstrom. I set up the shots and appear in them. |
|
 to the WRENCH page |
|