|
 |
|
Obviously,
you’ll need a bike box. These are available at bike shops.
Call first to check availability. They'll need to know your bike size
to select the right box, too. Another specialty item is a fork protection
block. This is inserted into the fork to prevent damage. Shops can
supply this or you can make one out of a 1- x 1-inch block of wood 100mm
long with screws and washers in the ends. Shops can also provide an axle
protector, which is pressed onto the front axle to keep it from poking
through the box. Or you can cover the axle with cardboard. |
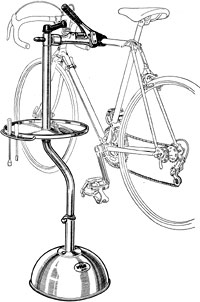
Required Tools
|
|
Now If you have bolt-on aero handlebars, remove them and put them on the bench for now. Remove any bar ends and put them in your parts bag. Ditto for water-bottle cages. If you have a computer, remove it from its mount, wrap it and put it in the parts bag. Then remove the computer mount from the handlebar, unwrap its wire from the brake cable and tie it out of the way so it doesn’t get damaged. Wrap the frame, fork and crankarms (photo), (tape the wraps in place).
If you’re packing a road bike, open the brake quick releases to create slack (photo a). For off-road bikes, unhook the noodles from linear-pull brakes (photo b) or release the cable ends on cantilevers. Depending on the type of shifters you have, how long the cables are and how the cables are routed, you may need to free your shift cables too in order to move your handlebars into position to fit them in the box. To do this, you need to create slack in the shift cables. Pedal by hand and push in on the rear derailleur to shift it onto the larger rear cogs. Because you didn't shift with the shift lever, there will then be slack in the rear shift cable. For the front derailleur cable, pull outward on the derailleur cage. On many bikes, this cable slack will make it possible to disconnect/free the shift-cable housing sections from the frame stops, which will provide plenty of cable slack for moving and locating the handlebars.
For linear-pull and cantilever brakes, remove the side of the brake that’s attached to the cable being sure to tape the parts together so they can’t get lost. Removing the brake like this retains your adjustment and lets the brake move with the handlebars.  Remove
the handlebars.
If you have a stem that can be opened to remove the handlebars, do so
and replace the stem bolts snugging them so they won’t fall out and
get lost during shipping (leave the stem in place on the bike). Remove
the handlebars.
If you have a stem that can be opened to remove the handlebars, do so
and replace the stem bolts snugging them so they won’t fall out and
get lost during shipping (leave the stem in place on the bike).
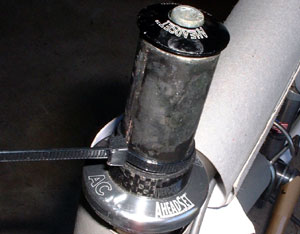
For other
types of handlebars and stems, you’ll need to remove the bars Be sure to reattach the top cap and spacers noting their position for correct reassembly. Also, install a zip tie (or tape) around the top of the fork just above the top spacer (photo) so it won’t rattle or fall out of the frame. If you have a quill-type stem (bolt on top), loosen the bolt on top a few turns and tap it with a mallet, which will drive down the wedge inside loosening the stem in the frame. For now, temporarily rest or tie the handlebars/stem assembly to the left side of the bike (non-chain side).
This simple device is important because it prevents serious damage to the fork should your box get dropped in shipping. Make sure it’s attached securely so that it can’t fall out during shipping. The photo shows a homemade wooden fork block. You should be able to get a plastic one from a bicycle shop. That type presses into the fork dropouts so no screws or tools are required. Another way to make a fork block is to use a piece of threaded rod long enough to reach across the dropouts. Then use 4 nuts and washers that fit on the threaded rod to bolt it in place with each pair of nuts tightened against each dropout. Usually,
you’ll have to weave the left crankarm Make sure no part of the crankarm touches any part of the rim, either, and that the axle cannot touch the frame tubes. Otherwise the frame could get dented or beat-up in transit. When you're satisfied that the wheel and crankarm are perfectly placed, tie the wheel to the bike in several places so it can’t change position (photo). You can also tie the crankarm to the frame to keep it from moving If you like. Then tie the bars in place. For dropped handlebars, try putting them under the top tube and partly inside the wheel (photo) or try resting the hooks on the top tube with the levers facing up. You may need to fine-tune the placement when the bike is in the box if the levers protrude too far. Levers are fragile and expensive, so situate them safely, padding them if necessary. Also, pay attention to the cables and housing so you don’t kink them. Maintain loops in the housing and keep trying until you find a handlebar position that’s safe.  Box
it!
Tape your parts bag shut and place it in the bottom of the box (it’s
a good idea to attach the bag to the bike so it can’t move around).
Rotate the fork 180 degrees, which will make the package a little shorter.
Now,
lift the bike and place it into the box so that the parts bag ends up
just behind the Box
it!
Tape your parts bag shut and place it in the bottom of the box (it’s
a good idea to attach the bag to the bike so it can’t move around).
Rotate the fork 180 degrees, which will make the package a little shorter.
Now,
lift the bike and place it into the box so that the parts bag ends up
just behind the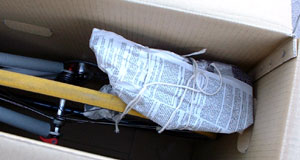 fork.
fork.
Wrap the seat/seatpost, rest it on the rear wheel and tie it to the wheel so it can’t get loose and bang up your bike (photo). Pack aero handlebars similarly or wherever they fit best. If you removed it, tie or tape the front brake so it can’t bang into anything. Then close and securely tape the box shut (don’t forget the bottom). Cross out any old addresses on the box (look carefully) because these could confuse the shipper. And, then write your shipping address on top of the box. You’re ready to go! Have a great biking holiday! Tips for packing and traveling
|
|
 Remove
the pedals, seat and seatpost.
To prevent injury, use pliers to remove any loose large staples in the
box top (often used to seal boxes at the factory). Put your shopping bag
on your bench to receive the small parts. Shift the bicycle chain onto
the small chainring and largest rear cog.
Remove
the pedals, seat and seatpost.
To prevent injury, use pliers to remove any loose large staples in the
box top (often used to seal boxes at the factory). Put your shopping bag
on your bench to receive the small parts. Shift the bicycle chain onto
the small chainring and largest rear cog. 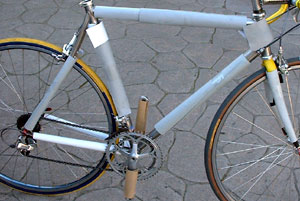 remove the pedals by turning the right counterclockwise and the left clockwise
(the left pedal is “reverse threaded”).
remove the pedals by turning the right counterclockwise and the left clockwise
(the left pedal is “reverse threaded”).  Create
cable slack.
Usually, you have to create cable slack and remove the front brake, or
part of it, to be able to remove and move the handlebars. But, you don’t
want to undo the cables at the
Create
cable slack.
Usually, you have to create cable slack and remove the front brake, or
part of it, to be able to remove and move the handlebars. But, you don’t
want to undo the cables at the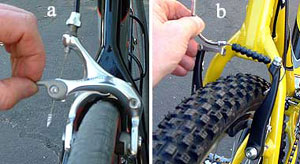 anchor bolts because this means having to readjust everything upon your
arrival.
anchor bolts because this means having to readjust everything upon your
arrival.
 Remove
the front brake.
If you have a road bike with sidepull brakes, remove the front brake from
the fork reattaching its nut and any hardware (photo) and wrapping
it in paper (do not detach the
Remove
the front brake.
If you have a road bike with sidepull brakes, remove the front brake from
the fork reattaching its nut and any hardware (photo) and wrapping
it in paper (do not detach the 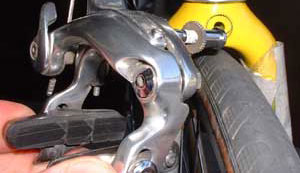 cable).
 and stem as a unit. For threadless models (bolts will be on the side/back
of the stem), loosen and remove the top cap, then loosen the stem bolts
and remove the stem.
and stem as a unit. For threadless models (bolts will be on the side/back
of the stem), loosen and remove the top cap, then loosen the stem bolts
and remove the stem.
 Remove
the front wheel.
Unscrew the quick release, extract it from the hub and then reassemble
it and place it in the parts bag. Press the axle protector onto one side
of the axle. Put the fork protection
Remove
the front wheel.
Unscrew the quick release, extract it from the hub and then reassemble
it and place it in the parts bag. Press the axle protector onto one side
of the axle. Put the fork protection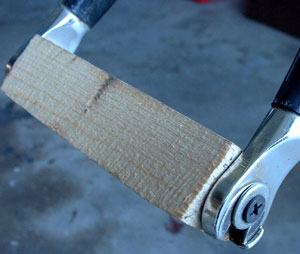 block in place between the dropouts (photo).
 Tie
the bike/wheel together.
With the bike resting on the ground, place the wheel next to the left
side of the bike with the axle protector facing out.
Tie
the bike/wheel together.
With the bike resting on the ground, place the wheel next to the left
side of the bike with the axle protector facing out.
 between
the spokes, which is why you wrapped it. That protects the spokes and
the crankarm, but make sure the crankarm isn't pressing on the spokes.
Usually you can find a way to place it inside the spokes without anything
pressing on anything else.
between
the spokes, which is why you wrapped it. That protects the spokes and
the crankarm, but make sure the crankarm isn't pressing on the spokes.
Usually you can find a way to place it inside the spokes without anything
pressing on anything else.
 Position
the handlebars.
If you’re packing a bike with flat bars, you can usually fit the
bars on top of the top tube and wheel. Place them so they’re as narrow
as possible so the bike will pass through the box opening. And make sure
that no part of the bars or stem can bang into the frame or rim. Add
Position
the handlebars.
If you’re packing a bike with flat bars, you can usually fit the
bars on top of the top tube and wheel. Place them so they’re as narrow
as possible so the bike will pass through the box opening. And make sure
that no part of the bars or stem can bang into the frame or rim. Add 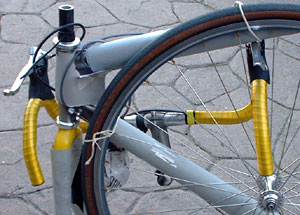 padding
if needed.
padding
if needed.
