BICYCLE REPAIR
|
The following advice is for loose-bearing types only. Rear hubs are described here because they are more complicated. Except for removing and installing freewheels and cassettes, front hub overhaul is identical. |
| Equipment: Round up the following:
|
|
 Remove the wheel. Unscrew and extract the quick release.
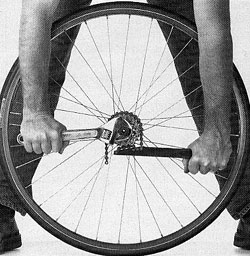
For conventional freewheels, install the proper remover. Insert, assemble,
and tighten the quick release (without springs) to hold the remover in place
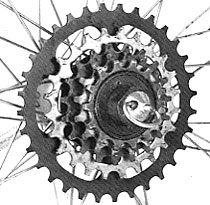
(photo, right). On cassette hubs, insert the lockring remover,
place a chain whip on the largest cog in a position to turn it clockwise.
Remove the wheel. Unscrew and extract the quick release.
For conventional freewheels, install the proper remover. Insert, assemble,
and tighten the quick release (without springs) to hold the remover in place
(photo, right). On cassette hubs, insert the lockring remover,
place a chain whip on the largest cog in a position to turn it clockwise. |
 |
 |
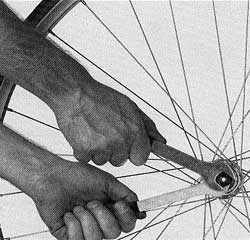
 Hold the wheel upright on the floor. Position the adjustable
wrench on the remover. Loosen freewheels by pushing down
(counterclockwise) on the wrench. An alternative is to clamp the remover
in a vise and turn the wheel counterclockwise. Once the freewheel breaks
free, remove the quick release and unscrew the freewheel the rest of the
way.
Hold the wheel upright on the floor. Position the adjustable
wrench on the remover. Loosen freewheels by pushing down
(counterclockwise) on the wrench. An alternative is to clamp the remover
in a vise and turn the wheel counterclockwise. Once the freewheel breaks
free, remove the quick release and unscrew the freewheel the rest of the
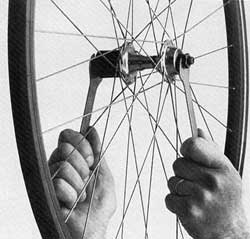
way.For cassettes, press down on the chain whip with your left hand while pushing down on the wrench with your right (counterclockwise; photo, left) to loosen and remove the lockring. Carefully lift off the cogs because if you drop them they will separate and the individual cogs and spacers will go everywhere.. |
 Clean the axle ends so you can see the various parts. Hold
the left cone and locknut with the proper size cone wrenches (alternatively,
use an adjustable wrench on the locknut). Turn the locknut counterclockwise
(photo). Unscrew it, remove the lockwasher and unscrew
the cone. Place each item on the rag in the proper order.
Clean the axle ends so you can see the various parts. Hold
the left cone and locknut with the proper size cone wrenches (alternatively,
use an adjustable wrench on the locknut). Turn the locknut counterclockwise
(photo). Unscrew it, remove the lockwasher and unscrew
the cone. Place each item on the rag in the proper order. |
 |
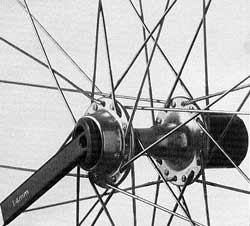 |
 Pull
the axle out of the hub from the right side. With a small screwdriver
or magnet, extract the bearings from both sides of the hub. Using the
end of a cone wrench or a large regular screwdriver, carefully (don’t
bend them) pry the dustcaps from both sides of the hub (photo).
If your dustcaps are attached to the cones, don’t separate them. Pull
the axle out of the hub from the right side. With a small screwdriver
or magnet, extract the bearings from both sides of the hub. Using the
end of a cone wrench or a large regular screwdriver, carefully (don’t
bend them) pry the dustcaps from both sides of the hub (photo).
If your dustcaps are attached to the cones, don’t separate them. |
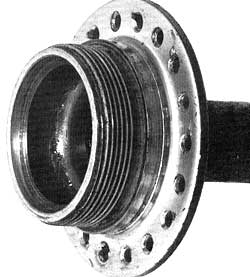
 Thoroughly clean the hub (poke a rag through its center),
axle, cone, locknut and dustcaps. Also, clean but don’t separate
the parts still on the axle. Examine the cones and hub bearing cups for
scoring or pitting (photo). Replace worn cones. When
replacing the one that’s still on the axle (right side), measure
the amount of exposed axle, position the new cone the same distance from
the end and tighten it securely against the lockwasher and locknut. Damaged
hub cups (see the pits in the hub cup bearing race in the photo) make
proper adjustment impossible and will wear parts rapidly. If your hubs
are pitted consider replacing the hub or buying a new wheel.
Thoroughly clean the hub (poke a rag through its center),
axle, cone, locknut and dustcaps. Also, clean but don’t separate
the parts still on the axle. Examine the cones and hub bearing cups for
scoring or pitting (photo). Replace worn cones. When
replacing the one that’s still on the axle (right side), measure
the amount of exposed axle, position the new cone the same distance from
the end and tighten it securely against the lockwasher and locknut. Damaged
hub cups (see the pits in the hub cup bearing race in the photo) make
proper adjustment impossible and will wear parts rapidly. If your hubs
are pitted consider replacing the hub or buying a new wheel. |
 |
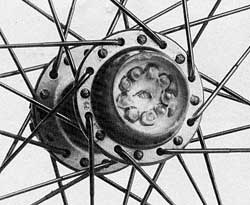 |
 Coat
both hub cups with a thin layer of grease. Place half the bearings
(be sure to use the right size for your hub), in one side and cover them
with more grease (photo). Press the dustcap into the hub
by hand, then seat it gently with the rubber mallet. Repeat the procedure
on the other side. Use cone wrenches to ensure that the right axle parts
are securely tightened against each other. Push the axle into the hub from
the right/cassette side. Coat
both hub cups with a thin layer of grease. Place half the bearings
(be sure to use the right size for your hub), in one side and cover them
with more grease (photo). Press the dustcap into the hub
by hand, then seat it gently with the rubber mallet. Repeat the procedure
on the other side. Use cone wrenches to ensure that the right axle parts
are securely tightened against each other. Push the axle into the hub from
the right/cassette side. |
|
 |
|
This article
is based on one I wrote for the February 1992 issue of Bicycling Magazine.
The photos are by Mel Lindstrom. I set up the shots and appear in them. |
|
 to the WRENCH page
|
|
 Thread
the left cone onto the axle by hand until it touches the bearings.
Install the lockwasher and locknut. Use cone wrenches to tighten the cone
and locknut against each other. A perfect adjustment will have a tiny
amount of play that will disappear when the wheel is clamped in the frame.
Grasp the end of the axle and move it up and down to check this. Turn
the axle to feel for smoothness.
Thread
the left cone onto the axle by hand until it touches the bearings.
Install the lockwasher and locknut. Use cone wrenches to tighten the cone
and locknut against each other. A perfect adjustment will have a tiny
amount of play that will disappear when the wheel is clamped in the frame.
Grasp the end of the axle and move it up and down to check this. Turn
the axle to feel for smoothness.