![]()
Look, guys, no tire levers!
Removing and installing bicycle tires by hand only — no levers needed — is the way we bike mechanics do it because it’s the easiest and fastest way. And, it’s the way bicycle tires are made to be installed and removed. So you could say it’s the right way to do it too.
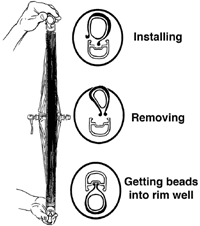
To explain the secret, I asked my friend, cyclist and illustrator Karl Edwards, to draw the steps. Click to enlarge it and see the details. Be sure to look at the hands too.
Using your hands only also speeds flat tire repair so you don’t cool down or catch a chill on wet or snowy rides. There’s also no need to dig in your seat bag for your tire levers. And, you won’t run the risk of a second flat by forcing the tire on with the levers, a common mistake, and completely unnecessary.
But the best reason to learn to pop bike tires on and off by hand is to impress your ride partners. The only problem is that once you show them, you may become the designated flat-fixer on rides from now on. But, like me, you might actually enjoy that. You can teach it too, like I do with my Jim Langley Easy Flat Repair Class at cycling camps. Here's a video of me fixing a flat for one of the cyclists at PacTour's Bike Friday Desert Camp with Coach Fred Matheny
Gorilla grip not necessary
Contrary to popular belief, tremendous hand strength has nothing to do with getting tires on/off by hand. What actually does is a simple mechanical principle designed into all clincher tires and rims - and this includes road and mountain, standard and tubeless tires.
But, the design is so old few people hear about it. Or maybe the original makers of tire levers conspired with the rim and tire makers to keep the hands-only instructions a secret so they could sell loads of tire levers? Joking!
Find the rim well

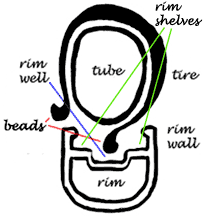
Here’s the secret. If you look at a rim with the tire and tube removed, you’ll see that there’s a channel at the center of the rim that’s significantly deeper than the sides of the rim where the tire sits when inflated. This is also where the rim strip, and the spoke nipples are. It’s called the rim “well,” and it’s the key to hands-only tire removal and installation.
Because the rim well is deeper, it’s also the part of the rim with the smallest diameter. In fact, if the rim didn’t have sides, you’d be able to place it inside the tire because that part of the rim is smaller.
How it’s done
There are sides on rims though. There have to be to keep the tires on when they’re inflated. So, to install and remove tires, you need to lift them over the sides of the rim. And, that’s where the rim well comes in.
The mistake people make and the reason tire levers seem necessary is because cyclists mistakenly install and remove the tires when they’re sitting on the sides of the rim where they are designed NOT to come off, so they don’t blow off when inflated.
By simply placing the tire in the rim well first, pushing and holding it there if necessary, the tire can be stretched by hand up and onto the rim for installation, or up and over the rim walls for removal.
Tips: For installation, it’s easiest to mount one side of the tire at a time. When removing tires be sure to let all the air out of the tube (or the tire with tubeless) and work as much of the tire as you can into the rim well before lifting it off. If it's a tire with tubes, it’s also best not to have too bulky a tube, as they interfere. For example, on road tires, use a 23mm-wide tube for 25mm road tires, i.e. one size smaller.
Lastly, it does take a little practice to master the hands-only technique, but it’s mostly a matter of using the rim well. Now that you know the secret, give it a try - you can do it!

