BICYCLE
REPAIR
|
 |
|
If you really want to be an expert, read them both! You might also want to learn to remove and install bike tires by hand only. That way you’ll be the fastest flat fixer when riding with friends and amaze them with your pro skills. |
|
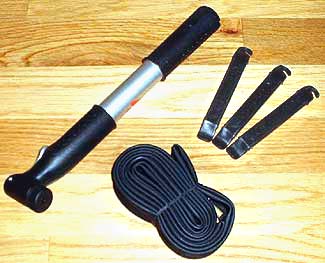
| What
You Need: As
shown in the photo on the right, you don’t need many tools to repair
a flat tire. From left to right: get a pump,
a spare tube and tire
levers. I’d also recommend carrying a patch kit, which comes in handy if you get back-to-back flats. And, get the full-on kit, rather than the so-called “glueless” kit because the regular patch kits fix the tube as good as new, while the other type is a temporary fix. Also, the longer the pump is, the easier it will be to inflate the tire. If you must get a mini because that’s all you can carry or mount on your particular frame, be sure to test it before buying to ensure that it does the job (some minis require way too much pumping). Read more about what to put in your take-along bicycle repair kit. |
 |
 Open
the brake:
As soon as you get that “sinking”
feeling or hear the hiss of escaping air, let your ride partners know
you have a flat (so they won’t disappear over the horizon) and stop.
If it’s a rear flat (it usually is), shift onto the smallest rear
cog. The first step in wheel removal is opening the brake (photos),
which makes it easier to get the wheel out. Open
the brake:
As soon as you get that “sinking”
feeling or hear the hiss of escaping air, let your ride partners know
you have a flat (so they won’t disappear over the horizon) and stop.
If it’s a rear flat (it usually is), shift onto the smallest rear
cog. The first step in wheel removal is opening the brake (photos),
which makes it easier to get the wheel out.
Open sidepull brakes by fully rotating the little
lever on the brake upwards (a). |
Tips Be safe! Work off the road/trail so a semi doesn’t flatten you! While it’s possible to get the flat tire through the brake without opening it, it won’t be so easy reinstalling the wheel when it’s fully inflated. That’s why we recommend opening the brake first. If you have disc brakes, there’s nothing to open. The wheel will come right out of the brake with no muss, no fuss. 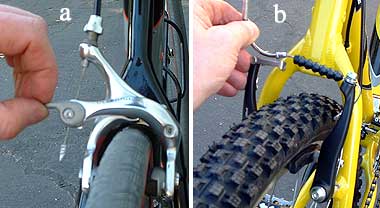 |
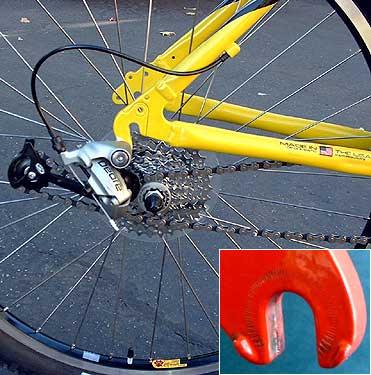 |
 Remove
the wheel:
Open the quick release
(or loosen the axle nuts) on the wheel with the flat and lift the bike
to remove the wheel. To extract rear wheels, it helps to pull the
derailleur back slightly to clear the axle parts as the wheel passes through
(main photo). Remove
the wheel:
Open the quick release
(or loosen the axle nuts) on the wheel with the flat and lift the bike
to remove the wheel. To extract rear wheels, it helps to pull the
derailleur back slightly to clear the axle parts as the wheel passes through
(main photo). For fronts, you’ll probably need to hold one side of the quick release and turn the other counterclockwise to create clearance to get past the wheel-retention tabs on the fork (inset photo). Tips |
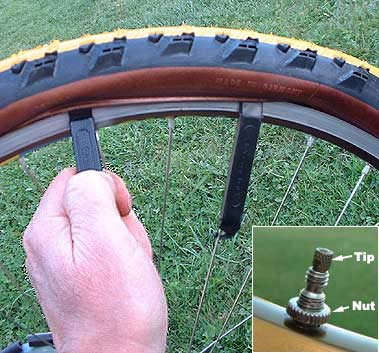
 Remove
the tire and tube:
Remove the valve cap (not shown) and nut (sometimes found on Presta valves:
inset photo). For Presta valves, unscrew the tip (inset
photo) and press down to let all the air out. For Schraders, poke
the end of your tire lever into the valve to release all the air. Starting
directly opposite the valve, wiggle a tire lever beneath the tire edge
(called the “bead”) and pry down to lift. If possible, hook
the lever on a spoke (many levers are made to do this), or hold it in
place. Place another lever about 6 inches away from the first and pry
here (main photo). Continue with your third lever until you can
get one side of the tire off. Then reach inside and extract the tube.
Pull the other side of the tire off the rim or pry it off with your levers.
Remove
the tire and tube:
Remove the valve cap (not shown) and nut (sometimes found on Presta valves:
inset photo). For Presta valves, unscrew the tip (inset
photo) and press down to let all the air out. For Schraders, poke
the end of your tire lever into the valve to release all the air. Starting
directly opposite the valve, wiggle a tire lever beneath the tire edge
(called the “bead”) and pry down to lift. If possible, hook
the lever on a spoke (many levers are made to do this), or hold it in
place. Place another lever about 6 inches away from the first and pry
here (main photo). Continue with your third lever until you can
get one side of the tire off. Then reach inside and extract the tube.
Pull the other side of the tire off the rim or pry it off with your levers.
Tips The Cobra
Tire Tool is a nifty lever that uses your bicycle to pry one side
of the tire off the rim. |
 |
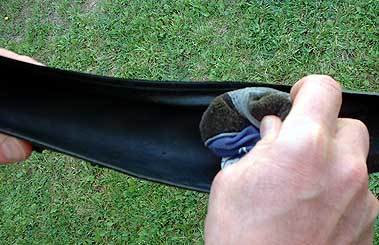 |
 Inspect
the tire:
It’s important to find whatever caused the flat and remove it.
If you don’t, the sharp item might still be in the tire where it’ll
just pop your new tube. To find it, remove your glove (or use a rag),
and run it around inside the tire in both directions (photo).
If something sharp is still stuck in your tire, it’ll snag the
glove. Remove it. If you can’t find anything, it probably got knocked
out during the disassembly procedure.
Inspect
the tire:
It’s important to find whatever caused the flat and remove it.
If you don’t, the sharp item might still be in the tire where it’ll
just pop your new tube. To find it, remove your glove (or use a rag),
and run it around inside the tire in both directions (photo).
If something sharp is still stuck in your tire, it’ll snag the
glove. Remove it. If you can’t find anything, it probably got knocked
out during the disassembly procedure.
Tips |
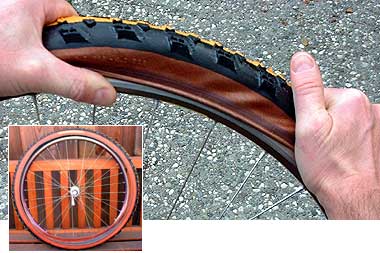
 Install
the tube & tire: 4 Easy Steps
Install
the tube & tire: 4 Easy Steps1. Inflate the new tube just enough to round it out and remove any wrinkles, and place it inside the tire. Stand the wheel up (rest it against your shins) with the valve hole on top and hold the tire/tube over the wheel so that the valve is on top (inset photo). 2. Place the valve partway into the hole and
simultaneously push the part of the tire bead that’s at the valve
and closest to your legs onto the rim. With both hands moving downward
away from the valve, finish working the bottom tire bead (the one
closest to your legs) onto the wheel all the way around. If it won’t
fit onto the rim, check that the valve is inside the tire, not trapped
beneath the bead. Tips |
 3. With one bead in place, tuck the tube fully inside the tire and on top of the rim, which will cause the other bead to rest flush against the rim. Work this bead on, starting at the valve as you did with the first. You may have to push the valve into the tire to provide clearance for the bead. Once you’ve got it started, work your hands away from the valve pressing the bead onto the rim around the wheel. 4. With a few inches of bead left to pop onto the rim, the tire will resist. Let all the air out. Crouch and rest the wheel on your knee to have something to push against. Now, hold the bead in place with one hand and with your stronger hand, push down to roll the stubborn section onto the rim with the heel of your hand (main photo). But don’t try to pop it on all at once. Install an inch at a time, moving your hand along until you’ve fully installed the tire. Got it? Way to go!!
|
Tips |
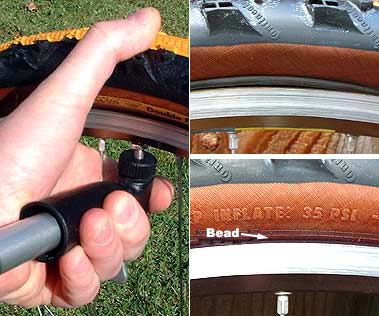
 Inflate
and seat the tire:
Place your pump on the valve and inflate the tire. To prevent valve damage,
brace it by wrapping a finger behind a spoke (photo left) so you’re
pushing against your hand, not the valve. Inflate the tire until it’s
just firm (not fully inflated). At this point, inspect the tire to make
sure it’s “seated,” which means that it’s sitting
correctly on the rim. Inflate
and seat the tire:
Place your pump on the valve and inflate the tire. To prevent valve damage,
brace it by wrapping a finger behind a spoke (photo left) so you’re
pushing against your hand, not the valve. Inflate the tire until it’s
just firm (not fully inflated). At this point, inspect the tire to make
sure it’s “seated,” which means that it’s sitting
correctly on the rim.
If the tube gets trapped beneath a bead (photo top),
inflating further may blow the tire and tube off the rim! |
 to the WRENCH page
|
|