|
|
|
Incorrect bicycle wheel quick-release use is dangerous because these mechanisms hold the wheels in place. The most common mistake using a quick release is simply turning the lever like a nut until the bike wheel seems tight. Used this way, due to the bumps and rough roads that vibrate your bicycle, the lever and wheel can loosen as you ride leading to catastrophe. Follow these directions and view the pictures and animation below to learn how to properly use a quick release. The beauty of the quick release is that it allows tool-free wheel removal and that makes it easy and fast to get the wheels off to put your bicycle in your car or fix a flat on a ride. It also, however, makes it easy for thieves to make off with a wheel or your bicycle if you don’t lock it correctly. |
|
Inspecting your quick release There are two ways to tell if the lever is open: most levers are marked “open” (photo) and “closed” so look for these markings. Also, levers are usually curved. When the bend protrudes outward like a bump, the lever is closed. When the bend is cupped, the lever is open. Closing and opening the lever requires flipping it 180 degrees, not rotating it. Even if the lever reads “closed” and looks right, it’s a good idea to test how tight it is by trying to open it by pulling on it. If it resists, it’s tight and safe. If it opens with only a little effort, it’s not tight enough. Follow my directions that follow to tighten it. |
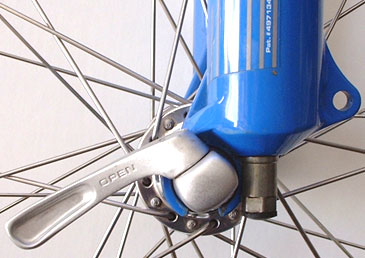 Read the lever to tell if it’s safe. If it reads “open,” the wheel can come off! It should read “closed.” |
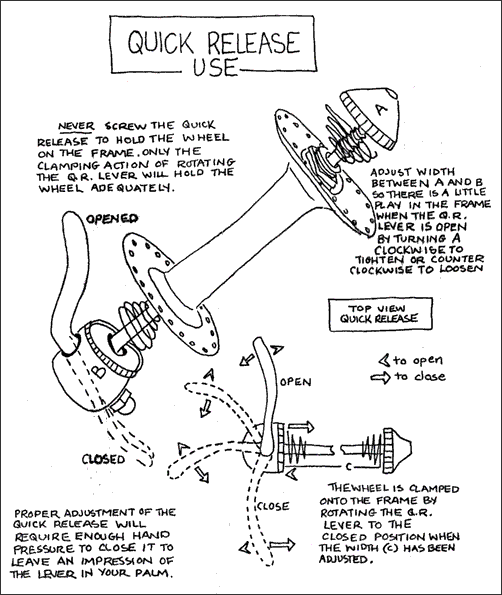
| Adjusting
and closing your quick release With the wheel centered in the fork (or frame), adjust the quick release by opening it, holding both ends and turning one clockwise until, when you close the lever about halfway, you feel some resistance. At
this point, try to close the lever. The adjustment is correct when you
can fully close the lever (animation) but with some effort (the
lever should leave its impression in the palm of your hand). If you
can only close the lever part way, open it, unscrew one of the ends
to open the adjustment slightly and try again. Most modern bicycle forks have wheel-retention tabs on them, which are small protrusions that keep a loose front wheel from falling out of the dropouts. The quick release must be open and adjusted by unscrewing it to clear these tabs when you remove and install the front wheel.
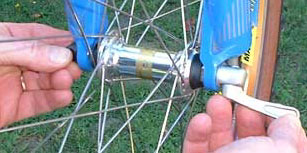
To do it for the front wheel, hold both ends of the quick release and
turn one counterclockwise to unscrew it (photo) until there's
enough clearance for the wheel to drop out of or fit into the fork (note
that this adjustment is unnecessary on most rear wheels because retention
tabs aren’t used).
Quick release use tips For
bikes with rim brakes, the quick-release levers should be on the left
side of the bike.
For
bikes with disc brakes, it's best to put the quick-release levers
on the right side of the bike so that the levers can never open and
get inside the disc brake rotor.
Quick
releases must be fully closed to ensure safety.
If
you close the lever in such a way that it aligns with the fork (see
animation) and stays, you’ll have something to grip while
squeezing the lever. It’ll also keep the lever tucked away where
it can’t snag anything, which might happen leaning your bike
next to another in a bike rack, for example.
If
you ever unscrew the quick release until it comes apart, don’t
panic! Just try not to lose the little springs. They’re not crucial
and the quick release will work without them. They’re only there
to provide spring pressure to maintain some clearance between the
ends of the quick release and the axle locknuts to make it easier
to slide the wheel into the frame.
To
reinstall the springs, make sure that the narrow ends point inward
(see top photo).
 Quick
release maintenance
Quick
release maintenanceAbout
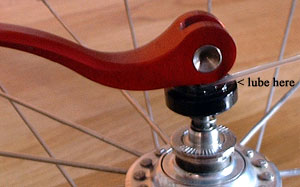
once a month, lube your quick-release levers because dry levers won’t
work well and can feel tight when they’re not tight.
Aluminum
quick-release levers usually press against bushings as you close the
lever. Lightly lube where the lever contacts the bushing (photo),
to keep the quick release operating properly.
Steel
levers usually pivot inside the cap. Apply lube to trickle inside
the lever’s pivot point.
If
there’s a nut or screw holding the lever (look beneath the cap),
snug it with a wrench or screwdriver to make sure it’s tight.
If
you notice
that the quick release cap (part "c" in the photo at the top of the
page), can only screw onto the end of the rod ("b" in the photo) part
way, make sure that at least half of the threads are engaged inside
the cap. Otherwise, you might damage the threads on the skewer or
in the cap when closing the quick release and not be able to tighten
the wheel. If the rod is so short that the cap only screws on a few
threads, you should purchase a longer quick release. The one you have
is not long enough for your bicycle, which can happen if the original
quick release was replaced for some reason. To get one that fits,
visit a bike shop so that you can try it on your bike and make sure
it's long enough.
If
you notice
that after taking apart and reassembling a quick release, that when
you put the wheel in the frame that it won't center in the frame or
doesn't fit like it did before in the frame, take another look at
the quick release springs (part "d" in the photo). Make
sure that the smaller ends of both these springs face in toward the
axle. If they get put in backwards, it lets them ride up and over
the axle where they can interfere with how the wheel fits in the frame.
To fix this problem, simply take the quick release apart and make
sure the springs are correctly oriented.
|
|
 |
|