Bicycle wheelbuilding is one
of the most satisfying skills you can add to your
bike repair expertise. When you’re able to lace spokes, true,
round and tension wheels, it’s a breeze keeping your bike going
(and your friends') if a wheel develops a wobble or breaks a spoke.
When it comes time to replace a worn-out rim, or better
yet, upgrade to the latest technology, you’ll save big doing
the work yourself. Plus, flying along on a beautiful pair of wings
you built yourself is fantastic.
This article explains the entire procedure to build
bicycle wheels from scratch. It’s designed for a complete beginner
and I’ve included every tip and trick from my career as a pro
mechanic, wheelbuilder and cycling engineer.
WATCH THE
VIDEO INSTEAD!
While it’s not possible to teach you all how to build wheels
in person, I can do it with video! I recommend you read the intro
below next because I go over tools, supplies and component selection.
As you continue reading or scroll, you’ll see the video and
can watch the show!
Intro
Keep bicycle wheelbuilding simple by not worrying about different
construction theories. Lacing patterns and spoke orientation are widely
debated among wheelsmiths but are trivial compared to component choices
and proper truing and tensioning. These are the primary factors that
determine a bicycle wheel’s integrity and are the focus of this
article.
If you’re interested in an excellent book on bicycle
wheelbuilding, read my late friend Jobst Brandt’s The
Bicycle Wheel 3rd Edition. Since it’s now out of print,
the prices have skyrocketed. Fortunately, over on the wonderful Wheel
Fanatyk website there's a
link to download a pdf of the book.
Tools and supplies
To build a bicycle wheel with traditional spokes and nipples, you
need a regular spoke wrench. I use the Park
Tool Black - size .127 spoke wrench - which fits the most common
spoke nipples used today and is a joy to hold and turn. Also round
up a plastic mallet, a nipple
driver or a small regular screwdriver, a
dishing tool (optional), grease or oil, and acetone or similar
solvent. You can see examples of the wheel tools on my
truing stand page.
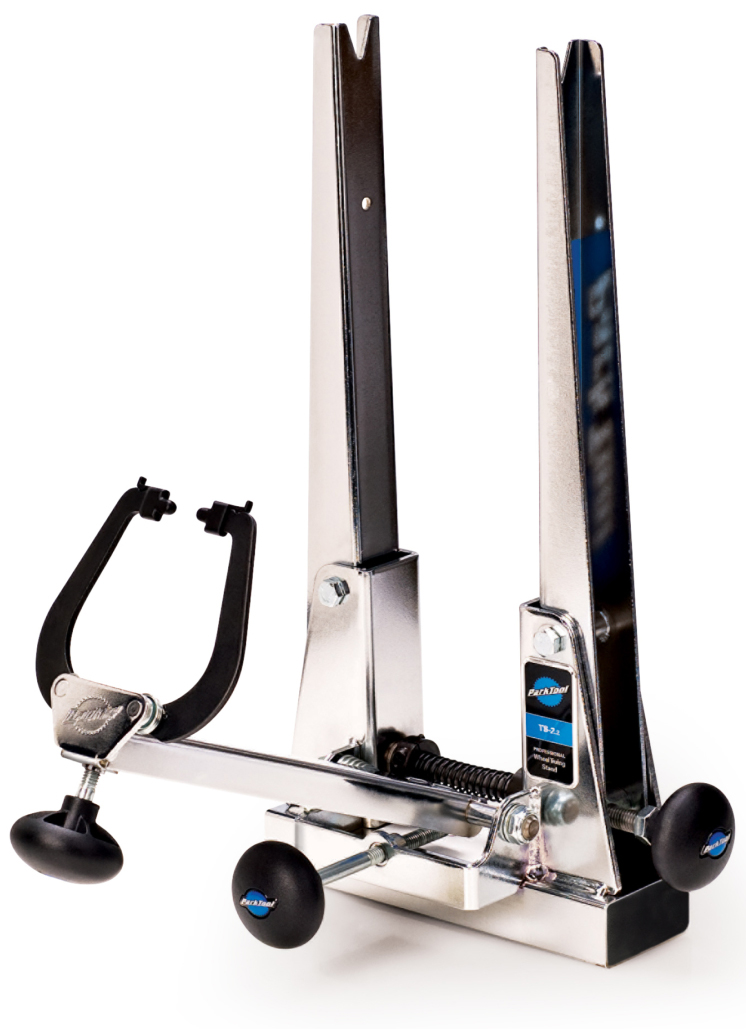
You might want a bicycle truing stand,
too (photo), which features indicators that make
it easier to see wheel imperfections as you’re truing and tensioning.
Quality truing stands like the Park
Tool TS-2.2 that I prefer are slightly expensive, so you might
choose to simply place the wheel in your bicycle frame or fork and
true it there.
Just use the brake pads as indicators resting your thumb
on one as you get the wheel nearly true to see and feel the wobbles.
This is the way I learned to true and tension wheels and it works
fine.
Master bicycle wheelbuilding and you’ll be
able to build your own wheels, true your friends’ wheels if
they get wobbly on rides and even make money building custom wheelsets
for your riding buddies too.
Four keys to a good wheel build
1. Lubricate It’s difficult to properly
tension wheels built dry because the spoke nipples feel tight before
they actually are. Also, the nipples may corrode if not lubed, making
future truing impossible.
2. Seat the spokes This eliminates slack by making the
spokes lie as flat as possible. If this step is neglected the spokes
will straighten and loosen when the wheel is ridden.
3. True, round, and center the rim before adding tension After lacing, it’s essential
not to force the rim into true by tightening spokes. Let the rim find
its low tension trueness by loosening spokes. Once the wheel is true
and round, then gradually add tension.
4. Stress-relieve repeatedly Place riding-type stresses on the
wheel by squeezing spokes or rolling the wheel while holding the axle
and pressing down. This further seats the nipples and spokes and relieves
wind-up that can allow spokes to loosen later.
Choosing components Hubs: These days all bicycle
hubs from major manufactures provide a stress-free spoke foundation.
The main decision concerns drilling, or how many holes there are in
each hub. The current norms for road and mountain wheels is 24, 28 and
32, which is fine unless you weigh more than 185 pounds. Heavier riders
or those planning to subject the wheels to hard use, such as loaded
touring or stunt riding, should consider higher spokes counts.
It’s OK to reuse old hubs if they’re still in good shape
(but not rims or spokes).
Another consideration with old hubs is how many times they’ve
been rebuilt. V-shaped spoke impressions on both sides of the spoke
holes indicate a hub has been used at least twice with different lacing
patterns, and the flanges could be weakened.
Rims: This is the main
structural component of the wheel, and selection is critical. Choose
according to your weight and riding habits. For clincher road wheels,
375- to 500-gram rims are sufficient for riders weighing up to 185 pounds.
Heavier cyclists should consider stouter models. Tubular (sew-up) rims
are somewhat stronger and allow use of slightly lighter weights.
Other choices include triangular (aero) or box cross sections, whether
the rim comes with or without nipple ferrules, and if it has offset
or centered nipple drilling. Keep in mind that aero rims ride harsher
than box-section models (today they are mis-named “double-wall”
rims for some unknown reason). However, aero rims add strength and are
a good choice for heavy use and for aerodynamic gains.
Spokes: I recommend using
quality stainless-steel spokes and matching nipples. Butted spokes and
aluminum nipples are the most popular choice. For durability and corrosion
resistance go with brass nipples. I prefer the brand DT Swiss for spokes
and nipples. They also make fine rims and hubs.
Proper spoke length is a prerequisite for durable wheels. I recommend
after selecting your components to have shop personnel calculate the
correct length for your setup. They should be happy to do this if you’re
buying a set of spokes from them, and there’s a benefit to buying
the spokes from them. If they get the length wrong, they’ll make
it right, whereas if you calculate the wrong spoke
length, you might not be able to return the spokes (depending on where
you bought them).
There are formulas and online tools for calculating spoke length, too.
Here is a free one provided by United Bicycle Institue: UBI
Spoke Length Calculator. Please note that it’s easy to make
mistakes. If you’re planning to build lots of wheels, consider
purchasing a spoke-length chart, or computer software or keep a record
of what lengths worked for the rim/hub combinations you’ve used.
These, as well as truing stands, books and other wheelbuilding tools,
are available from bicycle shops, though some things will need to be
ordered.
Front and rear wheels usually require different-length spokes. This
is because the rear needs slightly longer spokes on the left to compensate
for the offset of the cassette/freewheel. For rim brake wheels, buy
2 different-size bunches of 14, 16 or 18 spokes for the rear, 28, 32
or 36 of the same size for the front. For disc brake wheels, you will
probably need different lengths on both front and rear wheels due to
the offset on the hubs to acommodate the disc rotors. Once you have
your spokes, if they’re not already, mark each size accordingly
to avoid confusion during wheel lacing.
The crossing pattern also affects spoke length. I recommend 2 or 3 cross,
which means each spoke passes over or under 2 or 3 others on its way
from hub to rim. This makes for a strong wheel.
Preparing components
To ease truing and tensioning, apply oil, grease or thread compound
to the spokes and oil or grease to each rim nipple hole. For the spoke
threads, I prefer Wheelsmith’s
Spoke Prep. You must apply it carefully because too much will make
it harder, not easier, to turn the nipples. After applying it must dry,
too. When applied properly it will keep spokes from loosening and nipples
from freezing in place on the spokes for years (meaning you can still
true them if needed). An alternative is linseed oil, which becomes tacky
as it dries. Or, you can just lube the spoke threads with grease or
oil, which will at least ensure that you can get the wheel nice and
tight, plus prevent the nipples from rusting on the spokes over time.
A trick is to use an upside-down nipple threaded onto the end of a spoke
to grease rim holes. Just dab it in the grease and apply. This is especially
important on rims without ferrules because nipples bind against the
aluminum.
MY
WRITTEN INSTRUCTIONS CONTINUE BELOW. To make learning
to build wheels easy to learn, here is my youtube video in which I explain
and demonstrate every step of the process and share my pro tips and
tricks. It's an hour long show.
I recommend clicking on the lower corner of the screen to open the
video in a new browser tab. That way it'll be larger and you'll be able
to clearly see details. TIPS: You can pause and rewind
the video in order to work along with me as I show every step. You can
watch on a cellphone or tablet in your workshop. Also, I try to reply
to every question so if you leave one in the comments, I'll get back
to you as soon as I can with help. I appreciate you watching and subscribing
to my youtube channel.
Lacing
Because rear wheels are more complicated to build, my directions focus
on them with occasional comments for front ones. If you’re reusing
hubs, inspect the spoke holes. On some older hub models every other
hole is countersunk. If so, install the spokes so that the bend (not
the head) is against the countersink.
1.Place
the rim flat on a workbench with the valve hole opposite
you. Insert one of the shorter rear spokes into any hole in the rear
hub’s cassette-side flange. It can be put in from the inside
(head in) or outside (head out).
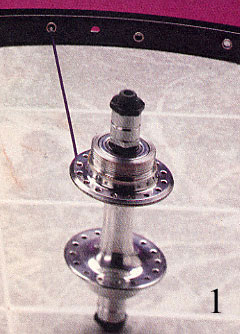
Looking at the 2 rim holes straddling the valve hole, determine which
is offset toward the top, push the spoke end in (photo1), and thread on a nipple 2 turns. On rims with
centered rim holes the spoke can be placed in either one next to the
valve.
2.In
the same direction you installed the first spoke, place 6
or 7 more into the hub (8 for 36-hole wheels) using every other hole.
One at a time, place these spokes into every fifth rim hole (counting
from spoke to spoke; photo 2) and add nipples. You
should have a hub and rim joined by 7, 8 or 9 spokes (for 28-, 32-
or 36-spoke wheels).
3.You must have parallel spokes at the valve stem to
provide clearance for pump heads. To achieve this, twist the hub to
wind the spokes in the proper direction before adding the second set.
Determine which way to twist from the location of the spoke nearest
the valve hole. If it’s on the left twist the hub to the left
(counterclockwise; photo 3). If it’s on the
right, twist to the right.
To hold the hub in place, insert a spoke through the cassette-side
flange in the opposite direction of the first set of spokes. (If they
were installed head out it should be placed head in.)
4.As you bring the spoke toward the rim, it must be
laced through its neighbors If you are installing head-out spokes,
each one must go under the first 2 it crosses and over the third.
Head-in spokes go over the first 2 and under the third (photo
4).
Then place it in the rim, centered between the spokes already in
place, and add a nipple. Be careful not to kink the spoke or scratch
the rim.
At this point it saves time to turn the nipples from outside the rim
with a Park nipple
driver or small screwdriver. But don’t tighten them more
than 2 turns because you don’t want to add any spoke tension
yet. Finish lacing the cassette side by placing the remaining 6, 7
(or 8) spokes through the hub, interlacing them, and adding nipples.
5. To make lacing the
other side easier, seat the spokes in the hub by pressing the head-in
ones with the palm of your hand or tapping them near the hub with
a plastic mallet (photo 5).
6.Lay the wheel on the workbench with the empty flange
facing up.
The next spoke’s position is
trickiest to locate and it’s very important to get it right.
It should be parallel to the first one you installed and next to the
valve hole in the rim.
Feedback from readers over the years that I’ve taught wheelbuilding
and written articles about it, convinced me that it’s far better
to demonstrate putting this all-important spoke into the wheel, than
trying to explain it with text.
So, for this step please click this
time stamp link to open a new browser playing my video at the
step where I demonstrate. It’s pretty easy to get this spoke
right with my trick.
7.Add
the next 6, 7 (or 8) spokes, filling every other hub hole.
Lace them into every fifth rim hole counting from left-side spoke
to spoke, and add nipples. Finish lacing the wheel by installing the
last 7, 8 (or 9) spokes. Put them through the hub in the opposite direction
of the set you just installed, and lace them to the remaining rim
holes.
Seat the head-in spokes as before (photo 5). Also,
seat the head-out spokes by pulling each one outward with your fingers
or by prying them with a screwdriver handle placed below the cross.
Seat the nipples in the rim by grasping parallel spokes and squeezing
gently.
Truing and tensioning tips
You should now have a laced wheel with parallel spokes at the valve
hole, interlaced spokes, seated heads, bends and nipples, and very
little tension. Check the crossing pattern one last time. Also, ensure
that alternate spokes lead to different hub flanges.
Remember that when viewed from outside the rim, clockwise turns tighten
and counterclockwise turns loosen spokes. Always use this perspective
or it can get confusing and you might tighten when you mean to loosen
and vice versa. Also, turn nipples in small increments. Half a rotation
is plenty.
To simulate riding stresses and relieve spoke wind-up that can occur
while truing and tensioning, it’s important to stress-relieve
the spokes after each step by squeezing parallel pairs around the
rim with your hands.
When the wheel is done the rim should be centered between the axle
locknuts. It’s easy to move the rim off center if you don’t
check it regularly while building. Several manufacturers make dishing
tools that allow you to measure this. The Park
TS-2.2 truing stand, which I mentioned earlier, automatically
centers the rim.
It’s also possible to center rims by simply reversing the wheel
in the truing stand or bicycle frame as you work. If you do this and
adjust the spokes to keep both sides of the rim the same distance
from one of the truing indicators or brake pad, it will be centered.
Truing
Place the wheel in a truing stand or bicycle frame. Starting at the
valve hole, spin each nipple onto the spoke with the nipple driver
or a flathead screwdriver until only 4 threads are
still exposed. This should supply just enough tension to straighten
all the spokes.
Spin the wheel. Adjust the truing indicators (or brake pad) so they
barely brush the rim. Study the rim as it spins and decide which section
needs to be moved. Use the spoke wrench to adjust the nipples in this
area. It’s crucial during the early stages to gently bring the
rim into true and round by loosening instead of tightening. For instance,
to move the rim left, loosen spokes in the area leading to the right
hub flange instead of tightening ones leading to the left. As the
wheel straightens, bring the indicators closer to the rim and continue.
To correct vertical movement, adjust the truing indicator under the
rim (if you’re using your bike frame for truing, rest your thumb
on the brake in such a way that you can view the gap between it and
the underside or top edge of the rim as the wheel spins). Work on
flat spots first, loosening an even number of spokes in the area to
allow the rim to move outward. Gently tighten an even number of spokes
to bring down high spots.
If you let the truing indicator brush the underside of the rim, you’ll
know when it’s perfectly round because it will stop scraping.
If you prefer to sight the space between the indicator and rim, a
light background will help. Place a piece of white paper on the workbench
in your line of vision.
When the wheel is round move the indicators beside the rim and perfect
lateral trueness again. Alternate correcting lateral and vertical
movement, and flip the wheel occasionally to check rim centering.
Eventually you should get a round, straight rim with low spoke tension.
Tensioning Increase tension by starting at the valve hole and working
around the rim, turning each nipple. For the rear wheel, which has
less tension on the left, turn the right-side spokes a half turn and
the left ones a quarter turn. This helps center the rim. For front
wheels, turn both sides a half turn at a time.
If a centering adjustment is required, first loosen all the spokes
leading to one side of the hub a quarter or half turn (every other
spoke) and then tighten those leading to the other side by the same
amount.
After each tensioning sequence, adjust the rim’s trueness, roundness,
and centering. In general, remember to turn the nipples a little at
a time, and move the rim by loosening one side and tightening the
other instead of doing just one. Also, stress-relieve the spokes after
each truing.
With each successive tensioning step the rim should need less truing.
After adding 4 to 6 rounds of tension it should be strong and the
spokes tight enough not to loosen, which is the mark of the good build.
It takes experience to recognize proper tension by feel. It helps
to squeeze spokes on hand-built wheels at a shop or check those of
another bike. On rear wheels you’ll notice that left-side spokes
always feel looser than right ones.
Other options are to buy a spoke
tensionometer or take your new wheels to a shop and ask them to
critique your work.
The last step is clean-up. This is important because wheelbuilding
lubricants can contaminate brake pads and some may deteriorate tires.
In a well ventilated area or outdoors please, thoroughly clean the
rim, hub, and spokes with a rag dampened with acetone or other solvent
(protect your skin and eyes). Good job!
This article
is based on one I wrote for Bicycling Magazine. My video was
self-produced.
The sequential photos are by Mel
Lindstrom.

 Lacing
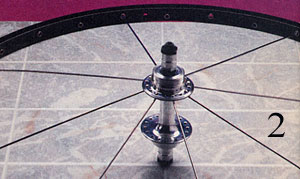
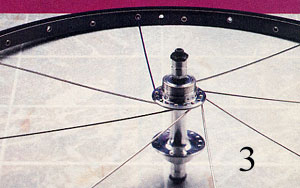 3.
You must have parallel spokes at the valve stem to
provide clearance for pump heads. To achieve this, twist the hub to
wind the spokes in the proper direction before adding the second set.
Determine which way to twist from the location of the spoke nearest
the valve hole. If it’s on the left twist the hub to the left
(counterclockwise; photo 3). If it’s on the
right, twist to the right.
3.
You must have parallel spokes at the valve stem to
provide clearance for pump heads. To achieve this, twist the hub to
wind the spokes in the proper direction before adding the second set.
Determine which way to twist from the location of the spoke nearest
the valve hole. If it’s on the left twist the hub to the left
(counterclockwise; photo 3). If it’s on the
right, twist to the right. 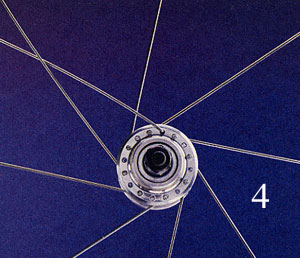 4.
As you bring the spoke toward the rim, it must be
laced through its neighbors If you are installing head-out spokes,
each one must go under the first 2 it crosses and over the third.
Head-in spokes go over the first 2 and under the third (photo
4).
4.
As you bring the spoke toward the rim, it must be
laced through its neighbors If you are installing head-out spokes,
each one must go under the first 2 it crosses and over the third.
Head-in spokes go over the first 2 and under the third (photo
4). 6.
Lay the wheel on the workbench with the empty flange
facing up.
6.
Lay the wheel on the workbench with the empty flange
facing up. 